Pages

Monday, April 30, 2012

Muffin Tin Lunch

I love Sundays.  It is our "Family Day" where we all get dressed nicely and spend time together as family for church.  After that, we go grocery shopping, head back home and play outside.  While the kids are playing, I put the groceries away and load up a simple muffin tin lunch for the kiddies. Thanks Muffin Tin Mom!


The children enjoy a lovely variety of different foods.  Food presentation is so important to them (and me!).  I find that they do eat better and it is easier to introduce one new food at a time.  Yesterday's lunch:  carrot sticks, cucumber sticks, bacon Caesar dressing/dip, grapes, pita pizza, diced cheese sticks and imitation crab. 

The wonderful thing:  I had to reload the muffin pans 2 more times!


I lined the cavities with silicone muffin liners.  I like that they help keep the non-stick finish intact, but it was a little tedious to wash all 12 of them afterwards.  It was easy to do, but a little mind numbing.  


They had a very nice picnic lunch in the family room.  My best friend made this gorgeous "Under the Sea" quilt for my son when he was born and we used that as our special indoor picnic blanket.  It was so cute to see the children gather around and enjoy lunch together on the weekends.


For more great kids' lunch ideas, check out Muffin Tin Mom.

Enjoy!

Saturday, April 28, 2012

Easy Pita Pizzas

I have no idea where the month has gone.  Somehow we got pretty busy.  What a week!  My son and husband had their first piano recital the other day and they were chosen to perform at the Encore performance last night! 

We needed a quick, easy Friday night dinner before the performance.  Pizza!


I also volunteered to bake some goodies for the Grades 4 to 7's Fun Day at my son's school yesterday.  Can I show you what else I've been up to?

  
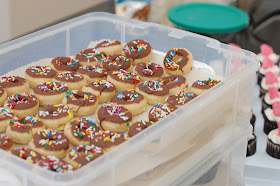
Almost 200 hand-dipped baked mini donuts.  Recipe here. 
 

2 dozen Chocolate Oreo cupcakes.  I forgot to buy mini Oreo cookies.  Luckily, cutting the regular sized ones in quarter pieces worked great!
 

2 dozen medium sized cupcakes for my son's class.  Topped with strawberry ice wafers for a change.  The ice wafers were easier to cut into smaller pieces than the Oreos.  I prefer not to use candy.  (I tell my kids that there's enough treats out there besides gummy bears). 


Look at all those goodies! 


All packed and ready to go!  

Several years ago, I found the Snapware 3-level cake/cupcake carrier (left) at Costco for $12 It carries 12 regular sized cupcakes per tier. The bottoms are reversible and can be turned to a flat surface for cakes or cookies (or mini donuts). Thank goodness I had the foresight to buy this before my oldest was in school.  I have a feeling it will be put to good use in the future.  The Wilton cake/cupcake carrier (right, from Walmart) carries 24 medium sized cupcakes.  The medium sized cupcake pan is hard to come by.  I bought mine at a consignment store about 10 years ago and I have never seen them again.  My advice:   when you buy a cake/cupcake carrier, check the size of cupcakes it holds. 

After baking and helping with Fun Day, I am a little tired.  All I wanted to do was pop a frozen pizza in and be done with dinner but I didn't have any!  Thank goodness my freezer had frozen pita bread!

When naan (Indian flat bread) or whole wheat pita bread goes on sale, I buy some to freeze for pizza crusts.  I had pita pizzas at a friend's house and it was so good!


So I gathered whatever I had in the fridge and pantry to throw some pizzas together.  That's the beauty of pizza:  just throw whatever you like on top of a crust of some sort.


Preheat oven 450F.  While oven is preheating, place frozen or fresh pitas on a tray.  


Add your favourite pizza sauce.  I use whatever pasta sauce I have in the in the fridge.  


Add your favourite pizza toppings.  Again, it's whatever I have in the pantry and fridge: Ukrainian sausage slices, black olives, fresh frozen pineapple, and frozen shredded cheese.

As an experiment, I bought some fresh pineapple on sale.  I chopped it up, froze it on a cookie sheet and then stored it in the freezer in a baggie.  Also, I buy bags of pre-shredded cheese on sale and freeze them for pizzas, pasta, sauces, etc.  Yes, you could also shred your own, but I like the different cheese blends that are available. 


Baked in the oven at 450F for approximately 10 minutes.  At this temperature, the edges get crispy.  They turned out very good!  Also good as appetizers and for parties.  

 
Another variation I made last week:  ham sausage, red peppers and leftover steamed broccoli!  

This doesn't really feel like a recipe.  It's more of a simple guideline as your tastebuds will dictate this dish.  I just wanted to document this one to my list of recipes. 

Easy Pita Pizzas

4 whole wheat or regular pita bread or naan bread 
3/4 cup your favourite pizza/pasta sauce
Ham, pepperoni, sausage or meat of your choice
Veggies:  red pepper, olives, broccoli, pineapple, etc.
Shredded mozzarella or pizza cheese of your choice

Preheat oven to 450F.

Place pitas on a lined baking tray.  Spread your favourite pizza sauce on pitas.  Add the toppings of your choice.  Top with shredded cheese. 

Bake for approximately 10 minutes or until cheese is browned.  


PS:  When my son came home from last night's performance, he was BEAMING!  (The performance was too late for his sisters.)  He received a Gold medal in the "Family Ensemble" category at our town's Festival of the Arts.  I am so glad he had such a positive experience at his first piano recital.  I'm a proud Mama! 

Enjoy!


Tuesday, April 24, 2012

Mini Cheesecakes

I am a proud mom and wife today!  We took our two oldest children to their first piano recital and had quite the morning.  Daddy and son rocked their duet performance.  Funny how all those years of piano lessons have come full circle.  Who knew that we would be playing piano duets with our children? My son had a great time and told us that he wasn't nervous at all... he was with his Daddy.  What a precious moment. 

My beautiful 4-year old daughter looked like a little China doll in her pretty pale pink, polka-dot dress. Our Mother and Daughter duet stole the show...without playing a single note!  My little doll was struck with stage fright.  Her eyes were as big as saucers when she saw the huge hall, the grand piano and all those people in the audience.  We managed to get to the stage and sit at the piano, but she shut down and could not play her song.  Ironically, she was the one who wanted to perform, not me!  Maybe in the future, I will be able play the duet with my daughter when she is ready.  


To celebrate such a great performance, I made mini cheesecakes with a raspberry topping.  I normally use canned cherry pie filling, but I had some frozen raspberries to use up.  This easy recipe has been a family favourite for almost 10 years!

 
One batch makes 48 mini muffin-sized or 12 regular muffin-sized cheesecakes.  I only had enough ingredients to make a half batch or 24 mini cheesecakes with my mini-muffin pan.  
 

I used paper liners about 1.25" in size for the mini cupcake pan.  Pretty small!  


Instead of Nilla wafers, I tried Digestive biscuits.  I normally use animal crackers, graham cracker or Oreo cookie crumbs.


I put 3-4 broken up biscuits into my mini food processor.  Gave it a whirl to make about 1/2 cup of crumbs.   I used my fingers to break up some of the bigger chunks.  This step can be skipped if you use graham cracker or Oreo cookie crumbs.

 
Use only 1/2 tsp. crumbs for a mini-muffin pan.  The bottom crust would get very crumbly if too much is used.  


I softened the cream cheese at room temperature for an hour, but I wasn't sure if it was soft enough, so I warmed it in the microwave for 20-30 seconds.  The slightly warmed cream cheese mixes better with the sugar, egg and vanilla for a smooth, lump-free batter.

  
The batter was pretty runny.  I found it easier and quicker to use a mini-ice cream scoop to fill each cavity. 


Bake at 350F for 15 minutes.  The cheesecakes puffed up and had a few cracks.  They were were easily hidden with some fruit topping!

Mini Cheesecakes

Makes 48 mini or 12 regular muffin-sized cheesecakes

1 (12 ounce) package vanilla wafers, animal crackers, graham cracker crumbs or other sweet biscuits
2 (8 ounce) packages cream cheese, softened to room temperature
3/4 cup white sugar
2 eggs
1 teaspoon vanilla extract
1 (21 ounce) can cherry pie filling, or 1/2 cup thawed frozen berries with 1-2 tsp sugar

Preheat oven to 350 degrees F (175 degrees C). Line miniature muffin tins with miniature paper liners. 

Crush the vanilla wafers or sweet biscuits, and place 1/2 teaspoon of the crushed cookie crumbs into each paper cup. 

In a mixing bowl, beat cream cheese, sugar, eggs and vanilla until light and fluffy. Fill each miniature muffin liner with this mixture, almost to the top. 

Bake for 15 minutes. Cool. Top with a teaspoonful of fruit filling of your choice. 


I'm happy.  The children proclaimed that they were "SOOOO GOOOOD".  

 Enjoy!


Thursday, April 19, 2012

Muffin Tin Snacks and Meals

This month, Baby has gone to the same preschool as Nessa, so that means there is another Snack Day added to the schedule.  My Baby is growing up too fast!  She too will learn about sharing her snacks with the rest of the class. 

I had mentioned before in my Oatmeal cookie post that her classmate has a sensitivity to wheat, dairy and eggs.   For peace of mind, I always try bring something that everyone can enjoy together.  That's part of the meal times we have at home, so why not school? 


Then I came across Muffin Tin Mom's idea of serving food in muffin tin cups.  Sheer genius! 

I used Baby's favourite fruits and snacks and put them in each muffin cup. I have silicone muffin cups on order, so I can reduce the waste of the paper liners each time. 

The possibilities are endless!  I used watermelon balls, strawberries, fresh pineapple spears, slices of ham sausage, crackers and gluten-free crunchy Rice Chex cereal.  Next time, I will do a myriad of veggies, dip, cheese cubes and fishy crackers.  With this presentation, there will be a little something for everybody.

This idea was so cute, I had to share it!  Over the weekend, I didn't know what to do for lunch, so I put some sausage, cheese, fruit, veggies and some crackers in a tin.  We had a wonderful little picnic on a quilt in the middle of the living room floor.


This idea would be fun for playdates and parties too!  

 Enjoy!

Tuesday, April 17, 2012

Blueberry Muffins

Blueberry muffins are a classic staple in our household.  When blueberries are in season and on sale, I buy as much as I can and freeze them on cookie sheets so we can enjoy them year-round. 


I have made many muffins and realized that I learned how to make muffins way back in my Grade 8 Home Economics class.  In just a few short years, my kiddies will be old enough to make this! 

Muffins are easy to make but I was in search of a recipe that was fluffy, fruity, lightly sweetened, moist and not dense.  My old stand-by recipe was pretty good but not as moist as I would have liked.   Then I decided to try the Blueberry Muffin recipe from The New Best Recipe cookbook as posted on www.simplyrecipes.com.  I needed to use up some plain yogurt.   

Boy, was I surprised how moist and fluffy they turned out!  Almost as fluffy as a cupcake, yet still a muffin.  Of course, I didn't follow the recipe exactly but close enough to get what I was looking for.  I never would have thought that plain yogurt is the trick! 


The batter was thick and fluffy due to the plain yogurt. 


A small sized ice cream scoop made the job so much quicker and easier.  


I was able to make 12 regular and 16 medium sized muffins from one recipe. 


I filled the muffin cups right up to the top.  I also dusted them with a bit of cinnamon sugar before baking.


Finished product!  Look how they rose and browned nicely. MMMmm... 

Blueberry Muffins

3 cups of all-purpose flour
1 Tbsp baking powder
1/2 teaspoon baking soda
1/2 teaspoon salt
10 Tbsp unsalted butter, softened  (I used 1/2 cup non-hydrogenated margarine)
1 cup sugar (I used 1/2 cup brown sugar, 1/2 cup white)
2 large eggs
1 1/2 cup plain yogurt
1 teaspoon grated lemon peel (I used 2 tsp vanilla extract instead)

2 cups blueberries
1 Tbsp flour (if using defrosted frozen berries)
 1 Tbsp white sugar  (optional cinnamon sugar for lightly sprinkling tops before baking)
1/4 tsp cinnamon   

Adjust the oven rack to the middle-lower part of the oven. Preheat oven to 375°F.

Whisk together the flour, baking powder, baking soda, and salt and set aside.

In a large mixing bowl, cream butter and sugar together, beating until fluffy. Add eggs one at a time, beating until incorporated after each one. Beat in the grated lemon peel (or vanilla).

Beat in one half of the dry ingredients until just incorporated. Beat in one third of the yogurt. Beat in half of the remaining dry ingredients. Beat in a second third of the yogurt. Beat in the remaining dry ingredients and then the remaining yogurt. Again be careful to beat until just incorporated. Do not over beat. Fold in the berries. If you are using frozen berries, defrost them first, drain the excess liquid, and then coat them in a light dusting of flour.

Use standard 12-muffin muffin tins. Coat each muffin cup lightly with olive oil or grapeseed oil using a pastry brush, or with a little butter. Or use one of those convenient vegetable oil sprays. Distribute the muffin dough equally among the cups. Sprinkle tops with a little cinnamon sugar, if desired.  Bake until muffins are golden brown, about 25 to 30 minutes. Test with a long toothpick (we use a thin bamboo skewer) to make sure the centers of the muffins are done. Set on wire rack to cool for 5 minutes. Remove muffins from the tin and serve slightly warm.


Yield: Makes 12-16 muffins. (I was able to make 12 regular and 16 medium sized muffins with this recipe.  I normally check the muffins after 15 minutes and then every 5 minutes until done, as every oven is different).  

- Adapted from The New Best Recipe, posted on www.simplyrecipes.com


Enjoy!

Thursday, April 12, 2012

Hamburger Patties with Flaxseed

Yesterday, I was in the mood for a nice, juicy hamburger.  Alas, I haven't had one in almost 2 years!  I had my gallbladder taken out last May and a weird trigger to my gallbladder attacks was commercially baked breads!  My attacks were getting so bad, that even pasta and rice started to wreak havoc.  

I was trying to find a hamburger pattie recipe that did not use breadcrumbs.  I did not feel like baking a loaf of bread to make breadcrumbs... It was great to see ground flax seed as an alternative!  

This recipe turned out very easy and tasty.  In place of salt, pepper and garlic powder, I used Montreal steak spice seasoning.  The ground flax seed gave the meat a very soft texture and it turned out very yummy!   

 Last night's dinner and today's lunch:  
Hamburger patties slathered in gravy along with organic spinach, kale, red chard and red peppers

Hamburger Patties with Flaxseed

1 pound organic ground beef
1 egg, beaten
1/4 cup almond or flax seed meal (I used flax seed)
1/2 teaspoon salt
1/2 teaspoon garlic powder
1/4 teaspoon ground black pepper
1/2 of an onion, finely chopped

Place all ingredients in a bowl, and combine with your hand or mixer. (I used my KitchenAid mixer.) In place of salt, garlic powder and black pepper, I used 3/4 tsp. Montreal Steak Spice seasoning.

Form into patties. 

Cook on a BBQ, Panini grill, or pan-fry until done to your liking. Serve over a bed of lettuce (surprisingly delicious and I didn't even miss the buns!) and top with ketchup, thinly sliced onions, avocado, etc. Makes about 8-10 small patties. 


Enjoy!

Wednesday, April 11, 2012

Oven Roasted Bacon

Whew!  What a wonderful Easter holiday!  A lot has happened the beginning of the month and I didn't expect April to be so busy.  First, Baby has started half-day preschool from Mondays to Fridays.  From 8:30am to 11:30am, she is hopefully improving her communication skills from screeching to *calmly and nicely asking* for whatever her heart desires.

When I had this free time in the mornings, did I relax?  Well... before I get to relax, I had to tackle a list of things to clean around the house.  Neglect around the house after three kids can get to a really disgusting state.  So I feverishly cleaned the house nonstop for 2 mornings straight. 

I got behind in documenting some recipes.  I had also meant to take pictures of our Easter dinner, but we got so hungry and devoured it before I even thought of getting out the camera!  I'll try again next Easter. 


Last week, I cooked bacon while I was cleaning the house.  Rather, I baked bacon!  I stumbled across this technique last year from Food Network's Barefoot Contessa and had to try it.  Our family LOVES bacon but I must admit, I find it a tedious task of slaving over the stove and being splattered with bacon grease.  I worry about Baby getting splattered with hot bacon fat.  It's bad enough while she is screaming for my attention, but even worse if she is screaming in pain from the splattering grease.  

This is the only way I will make bacon, as it is so EASY!  I wish I discovered this technique earlier.

I used a 500g or 1lb package of bacon and put it on a parchment-lined pan.  I bought a huge commercial sheet pan (16" x 22") at my local kitchen store and it worked perfectly for 1 package of bacon.  Before I bought my huge pan, I used 2 cookie sheets. 


The slices of bacon were placed side-by-side.  It's OK to have the edges touch as bacon shrinks while it cooks.  Bake at 400F for about 15-20 min. 

I usually turn on the oven and then put the pan of bacon in the oven before it hits 400F. 


After about 15 minutes, I check on the bacon.  The recipe doesn't say to flip them over but I do it anyways and check every 5 minutes until desired crispiness. 


A few more minutes and it's almost done!


Barefoot Contessa's Oven Roasted Bacon

1 500g (1lb) package of your favourite bacon

Preheat oven to 400 degrees Fahrenheit.
Place a sheet of parchment paper on a sheet pan.
Lay the bacon on top of the parchment paper.
Bake for 15 to 20 minutes until the bacon is really crispy.
Drain on paper towels and serve.

- Adapted from  Food.com: Barefoot Contessa's Oven Roasted Bacon


MMMMmmmmm....  YUMMY!  

Enjoy!


Sunday, April 1, 2012

Vanilla Chiffon Sponge Cake


I had some gorgeous fresh, farm eggs and some whipping cream in the fridge.  I haven't baked a cake in a while, but since I had these wonderful ingredients on hand, it would be a shame not to make a Chinese-style cake!  While the kiddies were (quietly!) playing puzzles, I took the opportunity to whip this up in my KitchenAid mixer. 
  
A classic Chinese-style bakery cake is a sponge cake that has a fruit or mousse-like filling, real whipped cream and fresh fruit decorations.  This was the kind of cake my mom made for our birthdays when we were growing up. 

I remember helping my mother decorate our birthday cakes.  She would bake the sponge, whip the cream and I would help decorate.  At the age of 10, my mother let me pipe luscious swirls of whipped cream and artistically place sliced fresh or canned fruit on top.  As the years passed, the cakes became an elaborate affair of fruit and whipped creamI can't believe that in a few years, I will be repeating this tradition with my little ones.  

Mom's sponge cake was always heavenly.  Although it tasted good, it would collapse after she pulled it out of the oven and we would simply hide the imperfections with whipped cream and fruit.  Because her recipe used 9 eggs per cake, I needed something lighter.  I have been searching for a recipe like the commercial Chinese bakeries, but I had found out that many of the popular bakeries use a sponge cake mix, filled with emulsifiers and preservatives.

Little did I know that my Betty Crocker cookbook (that I had for almost 20 years) had the sponge cake recipe that I was looking for!  It was a relatively straight forward recipe, considering that I had made so many different kinds of cakes to re-create those of the Chinese bakeries and my childhood.

This is my go-to recipe!  The hardest part is separating the egg whites and yolks.  I only use cake flour to get the tight sponge crumb texture like that of the bakeries.  All-purpose flour is OK, but since I was trying to re-capture my fond foodie memories, only cake flour will do. Due to the baking powder, I didn't have to worry about deflating the egg whites while folding.  The baking powder is there as a fail-safe measure, so I know that it will rise!

The original recipe says to use 1 angel food cake pan.  I prefer to split it up in two tube pans for two reasons:  1) you get 2 cakes; and 2) it bakes in about half the time.  Today, I used two 10" round pans and one 10" springform pan, all lined with parchment paper.  I had to adjust the time considerably, about 15 minutes, but it depends on the oven and pans used.  I usually freeze the extra cake for another occasion.


Vanilla Chiffon Cake

2 cups all-purpose flour, or 2 1/4 cups cake flour
1 cup granulated sugar
3 teaspoons baking powder
1/4 teaspoon salt
3/4 cup milk or water
1/2 cup vegetable oil
2 teaspoons vanilla
7 egg yolks (or 5 if using cake flour)
1 cup egg whites (8 eggs)
1/2 teaspoon cream of tartar

Move oven rack to lowest position. Heat oven to 325°F. In large bowl, mix flour, sugar, baking powder and salt. Beat in cold water or milk, oil, vanilla and egg yolks until smooth.

In large bowl, beat egg whites and cream of tartar with electric mixer on high speed until stiff peaks form. Gradually pour egg yolk mixture over beaten egg whites, folding with rubber spatula just until blended. Pour into 2 ungreased 10-inch angel food (tube) cake pans.

Bake about 25-30 minutes or until top springs back when touched lightly. Immediately turn pans upside down onto heatproof funnel or bottle. Let hang until completely cool, about 1-2 hours. Loosen side of cake with knife or long, metal spatula; remove from pans. 

Adapted from: Betty Crocker's Lemon Chiffon Cake 

Vanilla Whipped Cream

Beat 1 cup whipping (heavy) cream, 3 tablespoons powdered/ icing sugar and 1 teaspoon vanilla in chilled medium bowl with electric mixer on high speed until soft peaks form.

Betty's Tip: Well-chilled cream will whip the best, so keep it refrigerated until ready to use. It also helps to chill the bowl and beaters before you begin. When the cream begins to thicken as you beat it, reduce the mixer speed so you can watch carefully and beat just until soft peaks form. Overbeaten cream will look curdled.


- Adapted from Betty Crocker's Sweetened Whipped Cream

Be careful not to over beat the whipped cream, as it will turn into butter!  I like using icing sugar because it has cornstarch in it.  The cornstarch helps stabilize the whipped cream so it can retain its shape when piped.  

This basic sponge cake and whipped cream is very versatile.  Today, I filled my cake with vanilla whipped cream and placed canned fruit cocktail (drained and blotted dry) in the middle layer on top of the cream.   


For a 2-layer 10" cake, I used 1 1/2 cups whipping cream, 4 1/2 Tbsp icing sugar and 1 1/2 tsp vanilla extract.  This amount makes enough to frost, fill and pipe some swirls on top of the cake.  I used a Wilton 1M star tip for cupcakes for piping.  


[Edited to Add:  Last year's picture of my middle child's birthday cake decorated with lots of fresh fruit, canned fruit cocktail filling.  I used two 9"x13" pans to make a 2 layer cake.]


Enjoy!