Pages

Wednesday, May 30, 2012

Bento Lunch Wednesday - May 30, 2012

Over the weekend, I had a little "date" with my girls.  My son had a birthday party to attend and it was only fair that they get to go to a little party of their own!  I promised that we could go to a cafe for a treat.  On the way to the local coffeeshop, we went to our neighborhood kitchen specialty store to browse around.  It was more of a social occasion to drop by and say "Hi" to the owner.  And the girls got a new star cookie cutter for their sandwiches!  


I think this is one of my cutest meals yet!   My toddler's lunch:  grilled ham and cheese star sandwich, ham roll-ups, organic red corn tortilla chips and mini red & green grape skewers. 


My preschooler has a bigger appetite, so I gave her more "lucky star" grilled ham & cheese sandwiches.


My Grade 1 "big boy" has the same lunch.  He likes his sandwiches cut "normal".  


Lunch was a hit!  Their boxed lunches came back EMPTY and Mommy is HAPPY!

For more great bento lunch ideas, check out Bento Lunch. Have a wonderful day!

Enjoy!

Monday, May 28, 2012

Muffin Tin Monday - May 28, 2012

I used to hate Mondays.  I love them now.  It is the day after an awesome weekend filled with non-stop activity, birthday parties and family time.  Mondays can be a slow start, but since our family thrives on routine, the kids look forward to going to school and I look forward to cleaning up the weekend's mess!  

Poor hubby has no routine!  Since his work schedule is so erratic, I don't know where he is half the time.  Being a rural family doctor, he is either at the hospital ER, his office, the walk-in clinic, after-hours administrative meetings, at a medical course or off to deliver a baby!   We are very fortunate that daddy can work in the same town and does not have to be away from us for weeks at a time.  So yes, family time with mommy AND daddy is a special thing and not to be taken for granted.  

The kiddies really enjoyed lunch with daddy yesterday.  He had to rush off to deliver a baby in the middle of church but came home in time to share a Muffin Tin lunch. 


In our lovely muffin tin and silicone cups:  last night's baby corn, carrot and sugar pea medley, apple slices, organic red corn tortilla chips, crunchy & sweet green grapes, imitation crab, savory Caesar salad croutons and some sliced black olive & cheese bites.  It was a light lunch as the kiddies had some birthday cake beforehand. 


I really like our new weekend tradition where the children gather around our special picnic quilt and enjoy lunch together.  

For more great lunch ideas, visit Muffin Tin Mom!  Happy Monday!

Enjoy!

Friday, May 25, 2012

Microwave Popcorn in a Glass Bowl

Last year I stumbled across Snack Girl's Homemade Microwave Popcorn and thought it was the neatest thing to put popcorn kernels into a plain (food grade) paper bag and microwave it.  We tried the paper bag trick several times.  Then, I started thinking about the added cost and the extra waste of these brown paper bags. 


Out of curiosity, I used a large 2.4L/2.5 quart glass pyrex bowl, put in 3 tablespoons of corn kernel, and covered with a lightweight dinner plate (left a small vent for steam).  Within 5 minutes, I had microwave popcorn!


The largest glass bowl I had was a 2.4 quart glass bowl.  Any popcorn kernels will do.  When it is time to buy more popcorn, I will try organic non-genetically modified (GMO) popcorn.


Put in 3 Tbsp of popcorn in the bottom of the bowl.   


Cover the bowl with a lightweight dinner plate or glass lid.  (I love my new Corelle Iris set from Walmart!).  Leave a small gap to vent some steam.  Make sure the gap is not too big or else popcorn will escape!  Ready for the microwave!


Set the microwave for 5 minutes.  Popcorn is ready when the popping slows down to 5-10 seconds between pops.  For us, it usually takes about 4 min 30 sec.  


Done!  Success!


I like to use melted butter in popcorn.  No complaints from the kiddies!   Since the glass bowl is nice and hot, I just rub a pat of butter along the sides of the bowl to melt it.  Toss the popcorn around the melted butter.  You can use butter, extra virgin olive oil and other seasonings afterwards.   


I like to use a Herb and Spice sea salt blend in a salt grinder.  I ran out of the blend and made my own with coarse sea salt, rosemary, coriander and garlic dip seasoning (from our local garlic festival).  


Making microwave popcorn takes a few tries, even with the commercial stuff.  You don't want to overcook and burn the popcorn but you want to pop most of the kernels. It all depends on your microwave's personality, the thickness of the glass bowl and the thickness of the dinnerplate cover.  It took about 4 min 30 seconds for ours to pop.  If you use a paper bag, it takes less time to pop, as the heat penetrates the paper bag quicker than the glass bowl and lid. 

We don't have microwave popcorn all the time.  It's a nice thing to have 2-3 times in a month.  Yes, I have read the dangers of using the microwave.  Here's one article that I came across that has some good information to keep in mind (Microwave Hazards).  I like to read different sides of a story and decide from there. 

Glass Bowl Microwave Popcorn

3 Tbsp popcorn kernels
1 large 2.4Qt/2.5L glass bowl
1 large dinner plate or glass lid, large enough to cover the bowl but leave a vent
Popcorn seasoning of your choice:  butter, coconut oil, extra virgin olive oil, sea salt, etc. 

Place 3 Tbsp popcorn kernels in a large glass bowl.  Cover the bowl with a large dinner plate or glass lid.  Make a vent for steam to escape, approximately the width of a pinky finger.  Not too wide or the popcorn will escape!  

Microwave for 5 minutes or until there are 5 seconds between pops.  Do not burn the popcorn.  Microwave times depend the microwave, wattage, the thickness of the glass bowl and the thickness of the lid.  

Season popcorn as desired.  

 In case anyone is curious, I only had 8 unpopped kernels from this batch! 

Enjoy!


Wednesday, May 23, 2012

Bento Lunch Wednesday - May 23, 2012

What a beautiful day in Cariboo Country!  The weather here is very volatile.  One day last week, I was shoveling manure and topsoil in the bright sunshine and the next moment, it was snowing and hailing!  Thank goodness it only lasted a few minutes.  It rained all weekend and now, the sun is emerging to give us that bright and sunny start to the day! 


This is the view of Horse Lake from our deck.  The rainy weather just makes you appreciate the sunny days even more! 

I find that with these sunny days, the children prefer to eat finger foods.  They are more efficient with their fingers, so they can get back to playing FAST!  So I guess, the theme is "finger foods".  I finally figured out that the older children LOVE ham and tomato sandwiches with mayo!  I keep trying different types of sandwiches because they are easy to make. My 2.5 year old is moody with sandwiches.  Lately, she has not been interested.  But she loves plain meat!  But I still offer a sandwich, because I keep trying. 


My toddler's lunch has red grapes, fresh sugar snap peas, ham sausage slices, ham and tomato sandwich and Caesar salad croutons.  I ran out of little crackers, so why not crunchy savory croutons?  


My older children's lunch:  red grapes, sugar snap peas, Caesar croutons and ham & tomato sandwiches. In time, I can add some lettuce or cucumber to their sandwiches.  I normally introduce new food by slowly adding one new thing to their favourite dishes.  

For more great bento lunch ideas, check out Bento Lunch. Have a wonderful day!

Enjoy!


Tuesday, May 22, 2012

Honey Whole Wheat Banana Muffins

I told my kids that the brown spots on ripening bananas were "brown sugar spots".  The more spots, the sweeter they are... and that's how I got my kiddies to eat bananas as they ripened.  So if I want to make banana bread or banana muffins, I have to hide my ripe bananas or else they would be all gone!


I had 4 bananas that were ripe for baking.  I was inspired by my friend's gorgeous Banana Chocolate and Peanut Butter Muffins!  Alas, I am allergic to chocolate and hubby and the kids are allergic to peanuts.  Instead of chocolate and peanut butter,  I used different ingredients.  My last batch of whole wheat blueberry bran muffins turned out really good and moist, so I'll go whole wheat again.

I used a basic whole wheat banana bread recipe and made my modifications from there.  I wanted to use whole wheat flour, wheat germ, ground flaxseed, buttermilk, honey and coconut oil.  For more information about coconut oil, visit Dr. Oz's article on the Benefits of Coconut Oil.  

The result?  A very pleasant, not too sweet, moist and healthy banana muffin that my family enjoyed.  I will make this one again.  

If you are expecting a super fluffy, sugary sweet and intense banana flavoured muffin/cupcake, this is not it.  I told hubby that the muffin has the taste of honey whole wheat bread with a kiss of banana.  I find that the banana flavour intensifies when they are super ripe and a lot of sugar is added.  


Honey Whole Wheat Banana Muffins

1 ½ cups whole wheat flour
½ cup wheat germ
2 Tbsp ground flax seed
1 tsp cinnamon
1 tsp baking soda
1 tsp baking powder
1 large egg
1/3 cup honey
1/3 cup buttermilk
1 tsp vanilla extract
¼ cup canola oil, melted butter or coconut oil, melted (I used coconut oil)
4 bananas, mashed (between 1-2 cups)

Preheat oven to 400F

Mix all dry ingredients together.  Add egg, honey, buttermilk and vanilla to the dry ingredients.   Add bananas and melted coconut oil.  Mix until the ingredients are well blended together. 
  
Scoop batter in 12 muffin tins, each about ¾ full. 

Bake about 12-15min until done. Check the muffins around 10-12 minutes. Mine were done at 12 minutes.   

- Adapted from 100 Days of Real Food:  Whole Wheat Banana Bread


 Enjoy!

Monday, May 21, 2012

Muffin Tin Monday - May 21, 2012

Today is Victoria Day, which is a Canadian public holiday to commemorate Queen Victoria's birthday.  Since the kids do not have school, this is generally the first weekend to kick off camping season!  We didn't go anywhere far this long weekend.  Hubby had a maternity patient that was due any day now, so we stayed home for a nice relaxing weekend. 

For this week's Muffin Tin Monday, I thought it would be nice to pack a nice picnic lunch!  It was overcast and cloudy, but that didn't stop us from going out to enjoy family time together.

I grabbed my trusty Tupperware container, got some silicone muffin cups and started scrounging around the fridge and pantry.  Luckily, I had some nice leftovers from yesterday's breakfast and dinner.  


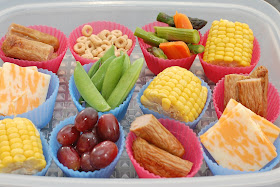
I packed some leftover breakfast sausage, cheerios, last night's asparagus & carrot stirfry, oven roasted corn, fresh sugar snap peas, marble cheese slices and red grapes.

  
What a tasty lunch!
 

Ready to go!  During transport, some of the food fell out of the liners and some of the food got jumbled around.  Next time, I'll have to find a container that fits food tighter to keep everything in its place.

The long weekend went by pretty fast. The kiddies enjoyed a nice outing the other day on our beach at Horse Lake, BC.  We grabbed our camping chairs, packed a lunch and enjoyed what nature had to offer. 


For more great lunch ideas, visit Muffin Tin Mom!  

Enjoy!

Thursday, May 17, 2012

100% Whole Wheat Chocolate Chip Cookies

Here is another classic treat in our household:  whole wheat chocolate chip cookies.  I used the famous Toll House cookie recipe and changed it a little.  I couldn't help myself. I made them with whole wheat flour!  


I have seen many chocolate chip cookie recipes that use a blend of whole wheat and all-purpose flour.  Instead, I used all whole wheat flour and omitted the salt. 

Ever since I made them 100% whole wheat, it has been my reliable and most trustworthy chocolate chip cookie recipe for over 5 years.  The true test was when I made these cookies for my son's 4th birthday party, over 3 years ago.  I baked these cookies and the children ate them without noticing that they were whole wheat!  
  
It helped that I put one Smartie candy in the middle of each cookie.  No complaints at all!  They still have loads of fat and sugar, so consider them a heartier treat. 

  
Whole Wheat Chocolate Chip Cookies

2 1/4 cups whole wheat flour
1 teaspoon baking soda
1 cup (2 sticks) butter, softened (I used 1 cup soft non-hydrogenated margarine)
3/4 cup granulated sugar (I used 1/2 cup granulated sugar)
3/4 cup packed brown sugar (I used 1 cup brown sugar)
1 teaspoon vanilla extract
2 large eggs
2 cups (12-oz. pkg.) chocolate chips (I used 1 cup chocolate chips)
1 cup chopped nuts (optional, I omitted)
Preheat oven to 375° F.

Combine flour, baking soda and salt in small bowl. Beat butter, granulated sugar, brown sugar and vanilla extract in large mixer bowl until creamy. Add eggs, one at a time, beating well after each addition. Gradually beat in flour mixture. Stir in chocolate chips (and nuts, if using). Drop by rounded tablespoon onto ungreased baking sheets.  At this point, I added 1 Smartie candy to each cookie before baking. 

Bake for 9 to 11 minutes or until golden brown. Cool on baking sheets for 2 minutes; remove to wire racks to cool completely.  

 
Within a day, they were all gone!  We ate some and then shared the rest with our wonderful friends.  
Can you find the cookie with the hidden wink and smile?

Enjoy!

Wednesday, May 16, 2012

Bento Lunch Wednesday - May 16, 2012

My girls like to use these cute bunny food picks I got from Daiso (Japanese dollar store) in Richmond, BC last year.  I will have to get some more different bento lunch accessories from that store the next time I am in that area.  

I find that the kids eat better when their food is in different compartments and they like to use little toothpicks or food picks. 


I placed some whole grain wheat thin crackers, some Japanese strawberry filled wafer cookies, last night's baked ham, cucumber sticks, grapes and red peppers.  I think I have most of the food groups covered!

Again, the kids meals are based on whatever I have in the fridge and pantry.  There are wonderful themed bento lunches on Bento Lunch.  For now, I am happy that the kids eat whatever I give them.  When they are older, they can fix their lunches by placing whatever they like in the muffin liners.

  
It's easier to make the kids' lunches together and I'm lucky that they like the same food!  

For more great bento lunch ideas, check out Bento Lunch.

Enjoy!


Tuesday, May 15, 2012

Coffee Chiffon Rose Cake

Mother's Day weekend was lovely.  It was filled with lots of hugs, kisses, cards, presents, and time spent in the garden. 

Of course, I still had to make dinner, dessert, vacuum and wash the floors.  Nothing better to a mother than a nice, enjoyable meal and a fresh clean floor!

For dessert, I wanted to make a special Mother's Day cake.  With roses.  With coffee.  With fresh whipped cream.  Without chocolate.  In the past few months, I noticed that I was getting an allergic reaction to chocolate and cocoa.  It was enough for me to be very uncomfortable with a super itchy face after tasting the stuff.  I'm hoping that it is a temporary thing.  I developed a seafood allergy (hives) at age 16 and was somehow able to eat prawns, crab and lobster again after seven years! 

No worries, there are PLENTY of yummy things other than chocolate.  I'm patient and hopeful.  Maybe I can eat chocolate again in seven years.  In the meantime...


Here is my Rose Cake!  I was inspired by my friend's beautiful Rose cupcakes. (Thanks Q!)  I had the popular Wilton 1M star tip and the roses were very easy to pipe.  I followed I am baker's Rose Cake Tutorial and was able to make a very pretty cake with vanilla whipped cream.  I whipped the cream until it got to the stiff peak stage, about 4-5 minutes (the time depends on the brand of whipping cream, so keep a close eye). 

The coffee sponge cake recipe is from My Food Affair.  It is a very close adaptation of my  Vanilla Chiffon Sponge Cake.  With only the addition of instant coffee (I used decaf for the kiddies) and more sugar, the change was so good!  I was able to fill two 8" round pans and one angel food cake pan.  I cut up the extra cake (from the angel food cake pan) into smaller servings, wrapped them in cling wrap and then froze them in a large freezer bag to enjoy later.   

 The cake was not too sweet and the fresh whipped cream complimented the coffee flavour of the cake.

Coffee Chiffon Cake

2 cups all-purpose flour, or 2 1/4 cups cake flour
1 1/2 cups granulated sugar
3 teaspoons baking powder
1/4 teaspoon salt
4 tablespoons instant coffee
3/4 cup water
1/2 cup vegetable oil
2 teaspoons vanilla
7 egg yolks (or 5 if using cake flour)
1 cup egg whites (8 egg whites)
1/2 teaspoon cream of tartar

Move oven rack to lowest position. Heat oven to 325°F. In large bowl, mix flour, sugar, baking powder and salt. Dissolve instant coffee with 3/4 cup water.  Beat in coffee mixture, oil, vanilla and egg yolks until smooth.

In large bowl, beat egg whites and cream of tartar with electric mixer on high speed until stiff peaks form. Gradually pour egg yolk mixture over beaten egg whites, folding with rubber spatula just until blended. Pour into 2 ungreased 10-inch angel food (tube) cake pans.   

Bake about 25-30 minutes or until top springs back when touched lightly. Immediately turn pans upside down onto heatproof funnel or bottle. Let hang until completely cool, about 1-2 hours. Loosen side of cake with knife or long, metal spatula; remove from pans. 

I decorated this cake with Vanilla Whipped Cream.  I doubled the recipe and was able to fill and decorate one 8" double layered cake with piped roses. 

Note: This batch yielded two 8" round cake pans, with the bottoms lined with parchment paper (baked for 15 minutes) and one 10" angel food cake pan for about 30 minutes.  Next time, I will bake the whole batch in two 9x13 pans for about 15 minutes for a bigger double layered cake.    


Soft and cloud-like, chiffon cakes go down too easy!

The cake turned out so pretty.  Perfect for Mother's Day!

[Edited to add: ] Here is another picture of a coffee sponge cake I made last summer.  Back when I was able to eat chocolate. 

 Luscious fresh raspberries on a coffee sponge cake with whipped cream and shaved Callebeaut dark chocolate.  Also very yummy!

Enjoy!

Monday, May 14, 2012

Muffin Tin Monday - May 14, 2012

What a great Mother's Day weekend!  We usually celebrate our holidays for almost a week.  It all started when hubby had to work Christmas Day or Christmas Eve several times the past few years.  To get around this, we celebrate over a course of a few days.  It's great when my birthday lasts for a week!  

We were busy with activity the whole weekend. The kiddies were starving when we got home after their piano lessons.  Of course, that's when moms become Iron Chef Mommies...complete with a panel of judges with discerning kiddie palates.

The theme?  Whatever in the fridge and pantry to feed starving, grumpy, whiny kids... it should be relatively healthy and FAST! 


This is what my fridge and pantry yielded:  red grapes, goldfish crackers, leftover oven roasted corn, leftover oven roasted bacon and yogurt with fresh strawberries.  


They ate in record time and declared themselves full after they inhaled everything!  Whew!  

For more great lunch ideas, please check out  Muffin Tin Mom.

Enjoy!


Saturday, May 12, 2012

Oven Roasted Corn on the Cob

It feels like summer is finally approaching when I see the corn on the cob and watermelon in the supermarkets.  However, in our rural Canadian southern interior town, it feels like spring is starting to emerge.  Our winters are long and sometimes very cold (as cold as -38C or -36F without the windchill!).  For a nice change, I bought some fresh corn and roasted them in the oven.  So tasty and so easy!


The corn steams and cooks in the husk.  The flavours are intense with this method.  This is Tyler Florence's recipe and yes, he knows how to eat!  


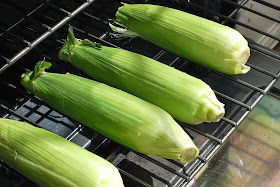
It was pretty easy to prepare the corn.  Rinse and trim some of the husks.  Make sure you don't cut too close to the corn or the tips might burn.


While rinsing, I even ran some extra water down the middle of the corn.  I like my corn juicy!


Place the ears of corn directly on the oven.  You can place as many as your oven fits!  Bake for 30 minutes in oven preheated at 350F.  I turn it halfway through.  


After 30 minutes, simply peel the husk and silk back.  It is really easy to remove.

Oven Roasted Corn on the Cob

Preheat oven to 350°F    
Rinse ears.
Place corn cobs in middle rack in oven. 
Bake for 30 minutes.  (I turn them halfway through)
Remove corn cobs. Pull back husks and enjoy!

Enjoy!

Thursday, May 10, 2012

Muffin Tin Snack Day

It's Nessa's turn for Snack Day at preschool and I think I have a system that provides a bit of everything for everyone.  There are 8 preschoolers in her class and I figure that a muffin tin of snacks can provide enough for that number of kiddies.


I tried to offer a variety of fruits and vegetables plus 1 protein.  Veggie cups have mix of cucumber sticks, baby carrots and sweet yellow bell peppers.  Even if the children don't eat their veggies, I know for sure they will gobble the bright red luscious strawberries and juicy watermelon balls.  I threw in the ham sausage slices for protein.  I really like how cute the silicone muffin liners turned out.  I guess the theme is "we eat whatever the supermarket has on sale and in season"!  


I also included a package of baked rice crackers.  Better to have too much food than not enough!

For more great kids' lunch ideas, check out Muffin Tin Mom.
  
Enjoy!

Wednesday, May 9, 2012

Bento Style Lunches

What do I do for the kids' lunches?  Most of the time, it's usually a sandwich, a fruit or veggie and some crackers in an Asian sandwich box.  I didn't know that I arranged my food in a "bento" style, which is a visually appealing meal packed in a box.  I had some square Wilton silicone muffin liners that turned out great for keeping the food separated in the way that my kids like.

I came across BentoLunch.net and was awed by the creativity that these moms have. It's wonderful how they lovingly prepared gorgeous lunches for their little ones.  It's a great site for getting ideas, but I am nowhere close to artistry involved!  I'm just happy that the kids have a somewhat healthy lunch.   


All 3 kids' lunches are assembled in production line!


Spring is finally in the air!  I love using cookie cutters for sandwiches.  Nessa's lunch:  butterfly soy butter and jam sandwiches, baby chick grilled cheese sandwich, last night's steamed baby corn/carrot/sugar pea medley, some apple slices and gold fish crackers. 


Baby's lunch:  Maple leaf soy butter and jam sandwich, butterfly grilled cheese sandwich, steamed veggies, apple slices and goldfish crackers.


My 7-year old's lunch:  grilled cheese sandwich, steamed veggies, apples and goldfish.  He is growing up!  Last year, he told me that he did not want his sandwiches to be cut in shapes.  To make everything fit in his stainless steel Lunchbots container, I trim the crusts. Pretty soon, I will have to get him a bigger container.  For now, he says it's enough food.

  
All packed and ready to go!  


 I found these super cute Hello Kitty lunch boxes at my local grocery chain.  They were only $4.99!  

Enjoy!