Pages

Monday, June 25, 2012

Muffin Tin Monday - June 25, 2012

Happy Monday!  After complaining about the rainy weather, it is nice to get a burst of sunshine this morning.  I've been juggling with someone (and myself) being sick, birthday parties, BBQ parties and special end of year events at the kiddies' schools.

I'm glad that my youngest is feeling better, but still very fussy.

I didn't have time to make a muffin tin lunch with a regular muffin tin, so it's just the girls' lunch with silicone square muffin liners.  These muffin cups are really good portions for the kiddies.   


I kept things simple today for the girls' lunches:  cut up strawberries and grapes, half a whole wheat honey banana muffin, ham roll-ups and last night's salad with cucumbers, yellow peppers and grape tomatoes (I took out the spinach and greens to make it easier to eat).


These lunches are actually pretty easy to whip up in a production line.  I threw three of these lunches together within 10 minutes!    
 For more great lunch ideas, visit Muffin Tin Mom!  Happy Monday!

Enjoy!

Thursday, June 21, 2012

Reduced Sugar Butter Tart Squares

In the middle of June, I had a craving for something that tasted like Christmas but it had to be easy, buttery and sweet.  Butter Tart Squares!  I like making one big pan full of yummy squares.  They are great for sharing!   


Butter tarts are a classic Canadian treat.  I usually see them on cookie platters around the holidays and Christmas.  These tarts are LOADED with sugar, raisins and nuts.  Classic ingredients for the holidays.

The original recipe was from Canadian Living Magazine.  I doubled the recipe to fit a 9"x13" pan but I cut the brown sugar in half!   Nuts were omitted due to nut allergies in the family.  I couldn't bring myself to use the whole amount of sugar.  

Everyone loved these squares!  Even with the reduced sugar, they were still sweet enough from the raisins and shortbread crust.  I don't like my treats tooth-achingly sweet, just sweet enough.  With butter.  For butter tart purists, you can add up to the full amount of sugar.  For us, it was tasty enough!  My son enjoyed each bite with his eyes closed...  YUM!

Reduced Sugar Butter Tart Squares
makes 1- 9"x13" pan

Crust:
2 cups all-purpose flour
1/2 cup granulated sugar (I used 1/3 cup) 
1 cup butter

Topping:
1/4 cup butter, melted
4 eggs,  lightly beaten
2 cups light brown sugar (I used only 1 cup!)
1/4 cup all-purpose flour
1 tsp baking powder
1 tsp vanilla
2 pinches salt
2 cups raisins (I used 1.5 cups)
1 cup coarsely chopped pecans (I omitted)

In bowl, combine flour with sugar; with pastry blender, cut in butter until crumbly. Press into 9x13-inch pan; bake in 350°F (180°C) oven for 15 minutes.

Topping: In bowl, mix together butter and eggs; blend in sugar, flour, baking powder, vanilla and salt. Stir in raisins and pecans; pour over base.

Bake in 350°F (180°C) oven for 20 to 25 minutes or until top springs back when lightly touched. Let cool on rack. (Make-ahead: Wrap and refrigerate for up to 4 days or overwrap in heavy-duty foil and freeze for up to 2 weeks.) Cut into squares.

- Adapted from Canadian Living Magazine: July 2009


Enjoy!

Tuesday, June 19, 2012

BBQ Pork and Tofu Chow Mein

Chow mein is another great family favourite.  It is a very versatile party side dish and is always a part of our family gatherings.  This recipe is my father's and I am glad he taught me how to make this. 


My dad's recipe is an awesome base chow mein.  Please note that this is a rough estimate of how I make chow mein at home.  Like most stir-fry dishes, the amounts are approximate and depend on what ingredients are in the refrigerator and what the kiddies like. In essence, this is a stir-fry with noodles tossed in like a salad!  

Feel free to use leftover roast chicken, pork or beef, so the meat is already cooked and easy to throw in.  Even the amount of liquid is approximate too.  If you find the noodles a little dry, don't be afraid to add an extra splash of chicken or vegetable stock.  When I don't have chicken stock, I have used water and added about 1/2 tsp amount of Knorr chicken stock cube too.  Again, very flexible.  

To season, I use oyster sauce or soy sauce.  I prefer oyster sauce and I have seen it at our local supermarket.  With the right amount, it gives the dish umami, or that "je ne sais quoi" pleasant savory flavour that one can't exactly pinpoint.  Because the ingredients are all an estimate, you have to taste the noodles to see if it is salty enough.  I usually add salt in 1/4 tsp increments.  Some people are watching their salt intake, so seasoning is very subjective.  Some may need more or less. *Disclaimer - so that people won't say this dish is too salty or too bland!

I usually make two batches of this recipe for my family.  It heats up great for the next day (or breakfast!) For potlucks and parties, I make 3 batches for a 9x13 glass or casserole dish.
  

I tried this brand from Superstore for about $0.98.  The noodles were slightly thicker but still good. 


There are different kinds of noodles out there.  I usually buy the dried egg noodles for about CAN$ 1.50 per package at the local supermarket (SaveOnFoods). Each package has about 8 dried noodle square pieces.  I cook 4 squares, or half a package at a time. 


You can also use the fresh egg chow mein noodles in the fresh produce section of the store. 

BBQ Pork Chow Mein 
from Michelle’s Dad 

1-2 Tbsp canola or extra virgin olive oil
1-2 medium carrots - julienned
1 large celery stalk- julienned
½ cup julienned cooked meat (chicken, pork, beef) or firm tofu
½ cup chicken or vegetable stock
1 Tbsp oyster sauce (or soy sauce - I prefer oyster sauce)
salt to taste (I use kosher salt)
1/2 package of 400g dried egg noodles,

Cook egg noodles in boiling water for 3 minutes max or until barely al-dente.  They should be chewy and not soft.  Take the noodles out of the water and spread onto a dinner plate, so the noodles can dry out. This will prevent the noodles from becoming mushy when they added to the vegetables and meat.  

Heat oil in a wok or large pot on medium-high heat. Saute carrots for 2 minutes, add sliced celery to the carrots and saute for 1 min.  Add ½ cup stock.  Cover with a lid and simmer for about 2 minutes until the vegetables are tender crisp (or softer to your liking).

Add cooked meat and/or tofu. Season with oyster or soy sauce and 1/4 tsp salt.

Turn off the heat and take the pot completely off the heat.  This step is important so your noodles will not get mushy.  Very important!  

Dump the cooked noodles to the vegetable, meat and stock mixture.  Use chopsticks or a fork to swish the noodles around the liquid.  As it absorbs the liquid, the noodles will loosen up and you can toss it around like "Italian pasta & sauce".

Taste the noodles and season again with salt & oyster sauce and serve.

Optional add-ins:  your favourite veggies, sliced cooked shitake mushrooms, bok choy, zucchini, etc.  Add this after the celery.  Snow peas and sugar snap peas do not need to be cooked very long.  I usually throw a handful with the cooked meat.   

Meat:  Char siu/chinese bbq roast pork, sliced chicken breast, leftover roast beef strips, cooked prawns (don’t overcook, or add it last!), sliced firm tofu


Enjoy!

Monday, June 18, 2012

Basic Yellow Cake

Here is my classic recipe for a"basic yellow cake".  I grew up eating Chinese-style bakery cakes, so my normal cake was a Vanilla Chiffon Sponge Cake.  However, this cake is a wonderful change from the feathery light chiffon sponges. This recipe is still very fluffy and tender. 


I used this recipe to make a White Forest Cake for Father's Day.  As you can see, there isn't much left over from dessert!   By the time I served the last piece, my son asked for seconds! 

This is a very easy recipe with basic ingredients.  I use this recipe in place of boxed yellow cake mix.  It is a versatile cake that can be easily paired with chocolate frosting or whipped cream (and cherry pie filling). 

I have tried different recipes for basic yellow cake and I still go back to my old Betty Crocker Cookbook's Starlight Yellow Cake.  The original recipe calls for shortening, but nowadays, butter is preferred.  When pressed for time, I use soft non-hydrogenated margarine for cookies and cakes instead of waiting for butter to soften.  Of course, some recipes have no substitutions for butter, but no one can tell the difference with this cake.   

I reduced the sugar to 1 cup and it is still very sweet, especially if a filling or frosting is used.  Because of this change, I should have reduced the milk, as the cake was not firm enough to withstand the weight of a triple layer cake.  Maybe next time, I will try to cut down to 3/4 cup sugar and 1 cup buttermilk if I use a buttercream frosting.

Basic Yellow Cake

1/2 cup butter, softened (I used soft non-hydrogenated margarine)
1 1/2 cups sugar (I used 1 cup sugar and it was plenty sweet)
3 eggs
2 1/4 cups flour
1 teaspoon salt (I used 1/2 tsp)
3 1/2 teaspoons baking powder
1 1/4 cups milk (I used 1% buttermilk)
1 teaspoon vanilla

Preheat oven to 350 F.

Grease bottom and sides of rectangular pan, 13 x 9 inches, 2 round pans 9 x 1 1/2 inches, or 3 round pans, 8 x 1 1/2 inches with butter and lightly flour.

Beat all ingredients with electric mixer on low speed 30 seconds, scraping bowl constantly.

Beat on high speed 3 minutes, scraping bowl occasionally; pour into pan(s).

Bake rectangle 35 to 40 minutes, 9-inch rounds 25 to 30 minutes, 8-inch rounds 20 to 25 minutes, or until toothpick inserted in center comes out clean or until cake springs back when touched lightly in center.

Cool rectangle in pan on wire rack; cool rounds 10 minutes; remove from pans to wire rack.

Cool completely, about 1 hour.

Frost as desired.

- From Betty Crocker's Cookbook: Everything You Need To Know To Cook Today

 
Enjoy!

Sunday, June 17, 2012

White Forest Cake

I asked hubby what dessert he would like for Father's Day.  He said, "Black Forest Cake".  Since I have a chocolate allergy, I had to make a little change to his request.


Normally I would use a rich dark chocolate cake with whipped cream and cherries.  This time, I used a basic yellow cake instead.  The verdict:  YUM!  As soon as I served the last piece, my son asked for a second piece!


I did not use any liqueur in the cake or filling since the kiddies were eating this.  If I did, I would add a splash of kirsch or amaretto to the cherry pie filling for that "adult" taste. 

Maybe it is my KitchenAid mixer, but I find that it does not whip the cream stiff enough to pipe if there is too much heavy cream.  To overcome this, I whipped the cream in two small batches to get that stiff piping consistency.  Make sure your bowl and beaters are chilled, so the cream whips faster and sturdier for piping.  

I thought that I could tolerate white chocolate, but I got a reaction from just the small shavings on the side of the cake!  I will think of something else to decorate the sides next time.   

White Forest Cake

1 basic yellow cake: 1 double layer 8 or 9-inch cake, or 1 triple layer 8-inch cake 
1 can cherry pie filling
2 cups heavy cream (2.5 cups heavy cream for triple layer cake)
6 Tbsp confectioner's sugar  (8 Tbsp icing sugar for triple layer)
2 tsp vanilla (2.5 tsp vanilla for triple layer)
white chocolate shavings, with a vegetable peeler

Prepare yellow cake and cool completely.

Whip 1 cup heavy cream with 3 Tbsp confectioner's sugar and 1 tsp vanilla for at least 3 minutes on high until the cream is stiff enough for piping.  Be careful not to overwhip the cream (mixture will separate and become butter!).

Place one cake layer on a cake plate.  Spread the cake with whipped cream and spoon cherry pie filling on top of the cream, in the middle of the cake.  Add the cherry pie filling until it reaches 1-inch away from the edge.  This will prevent the cherries from oozing from the sides of the cake.  

Repeat with the remaining cake layers.  Whip the remaining heavy cream, icing sugar and vanilla.  Frost and pipe the cake as desired with the whipped cream.  Decorate with the rest of the cherries and shaved white chocolate.

After dessert, there was only 1/4 cake left. Everybody had a second piece! 

Enjoy!

Wednesday, June 13, 2012

Bento Lunch Wednesday - June 13, 2012

Yesterday, I made some lovely fresh strawberry scones and the kiddies enjoyed them a lot.  I only managed to save the last 3 scones for lunches today!

Since I had some fresh strawberries, I thought it would be nice to have a "Sweetheart" themed lunch today.  Nessa helped make the heart-shaped marble cheese with a cookie cutter.  I have a feeling that she will want to make her own lunches soon!


Both lunches have:  mini strawberry and grape skewers, fresh strawberry scones, heart-shaped grilled cheese and turkey sandwiches, heart-shaped marble cheddar cheese and turkey roll-ups.  It is a very big lunch for my girls, so we'll see what's left at the end of the day.

On Monday, I made a Muffin Tin Meal for Snack Day at Nessa's preschool.  I made the mini fruit skewers again since the girls enjoyed them so much.   


For more great bento lunch ideas, check out Bento Lunch. Have a wonderful day!

Enjoy!


Tuesday, June 12, 2012

Fresh Strawberry Scones

I had some fresh strawberries that were begging to be made into something yummy!  Inspired by the Queen's Diamond Jubilee, I thought that Fresh Strawberry Scones would be wonderful with a cup of tea in this rainy June weather. 


They turned out lovely!  I made 2 batches (28 scones total) and after sharing some, there are only 4 left! 


They were pretty easy to make.  With a pastry blender, cut the diced butter into the dry mixture.


Cut the butter down to the size of peas and the flour mixture looks like coarse crumbs.   


Dump the yogurt and egg mixture into the bowl and toss around with a fork.  Don't worry if the dough is in shaggy clumps, it will come together.  


 Look at the luscious, juicy strawberries! 


Add the dice strawberries to the dough and gently toss around with a fork.  


The diced strawberries are pretty delicate, so use a light hand in mixing in the fruit with the dough.


Pour the unformed dough onto a lined baking sheet.  I used my Silpat liner.   


Use your hands to pat all the strawberries and dough in a rectangular shape.  


Carefully cut the dough into the shape and size as desired.  Make sure the liner is not damaged. I used the edge of my silicone spatula/flipper to cut the dough. 


 Ready for the oven!

Bake at 400F for 12-15 minutes, until golden.  From this batch, I was able to cut out 14 scones.  

Fresh Strawberry Scones 

1 cup whole wheat flour
1 cup all-purpose flour
1/3 cup sugar
1 teaspoon baking powder
1/4 teaspoon baking soda
1/2 cup cold butter, diced
1 cup diced fresh strawberries
1/2 cup non-fat plain yogurt
1 large egg

1/4 cup icing sugar
1/2 tsp milk (or more if necessary)
Adjust oven rack to lower-middle position and preheat oven to 400 degrees.
In a medium bowl, mix flour, 1/3 cup sugar, baking powder, and baking soda.  Add diced butter and use a pastry blender or two knives to cut the butter into the dry mixture until it resembles coarse meal with pea sized butter pieces.

In a small bowl, whisk sour cream and egg until smooth.
Using a fork, stir sour cream mixture into flour mixture until large dough clumps form. Use your hands to press the dough against the bowl into a ball. (The dough will be sticky in places, and there may not seem to be enough liquid at first, but as you press, the dough will come together.)
Place on a lightly floured surface and pat into a 7- to 8-inch circle about 3/4-inch thick. Sprinkle with 1 tsp. of sugar (optional). Use a sharp knife to cut into 8 triangles; place on a cookie sheet (preferably lined with parchment paper), about 1 inch apart. Bake until golden, about 12-15 minutes. Cool for 5 minutes and serve warm or at room temperature. 

To make icing glaze:

Add 1/2 tsp milk to icing sugar and mix.  Add extra 1/4 tsp milk at a time if needed. Drizzle the icing over the cooled scones.  Another option is to place icing in a ziplock bag, snip a tiny corner and pipe the icing on. 

- Adapted from Allrecipes.com: Simple Scones

  
Enjoy!

Monday, June 11, 2012

Muffin Tin Monday - June 11, 2012

Good Monday morning!  It is so nice to wake up to a nice sunny day (finally).  The past week has been so dreary and rainy.   It felt like I had the winter blues with 5 days of rain, rain, rain.  In the middle of that rainy week, I also cut out coffee from my mornings.  I switched to an organic dark roast coffee and it gave hubby and I some nasty acne!  Who knew that we would dealing with acne at almost 40?   I think the caffeine withdrawal affected me quite a bit.   Finally, my energy is increasing and my skin is getting better. 

With or without coffee, we have to keep going.  The kiddies were sick too.  I was battling the same bug.  Glad to be back on track today!  

Today is Nessa's Snack Day at preschool, so I just rounded up her favourites, as requested.


Today's snack:  all-beef hotdogs, sliced strawberries, cute mini strawberry and grape fruit skewers, cucumber slices and sliced baby carrots.  I'm still a little bummed that 2 of my silicone liners went missing at preschool from last week.  Oh well, back to using the paper liners. 

I stumbled across Schneider's Natural hot dogs at the supermarket.  They claimed that they only have natural ingredients, so I gave them a try.  We don't normally have hot dogs but I figure it is a nice change for Snack Day. 


According to the package, the ingredient list has only: beef, water, vinegar, sea salt, cane sugar, celery extract, spice, garlic powder and smoke.  Compared to the other brands, this list is short!  I was able to fit 5 wieners in 3 muffin cups!


For more great lunch ideas, visit Muffin Tin Mom!  Happy Monday!

Enjoy!

Tuesday, June 5, 2012

Whole Wheat Buttermilk Pancakes

For the longest time, my kids did not like pancakes!  Until I found the perfect buttermilk pancake recipe.  They loved the light and fluffy texture only real buttermilk gives.  I always thought that a reasonable buttermilk substitution was to add vinegar or lemon juice to milk.  However, there was actually huge difference in taste and texture.  The pancakes turned out softer, lighter, fluffier and very tender.  After all these years of baking, I have concluded that there is no substitute for real buttermilk!


Now that I got the kiddies to finally eat pancakes, I wanted to make them with whole wheat flour.  So I used a combination of whole wheat flour and wheat germ to lighten the texture.  With this recipe, I made 35 pancakes, using 1/4 cup batter for each pancake.  Yes, it makes a lot but I freeze about half the batch on a parchment lined tray in a single layer and then it goes into a freezer bag.  I always have pancakes on hand for quick breakfasts.  30 seconds in the microwave to thaw and heat a few pancakes and I'm done. 


Pancakes used to be so tedious to make in a frying pan.  I took a chance and ordered a reversible grill/griddle that spans over 2 heating elements on my stove.  I bought this Nordicware brand from my local kitchen specialty store about 5 years ago and I still use it on a regular basis.  It's so much fun to flip 8 pancakes at a time!


 Whole Wheat Buttermilk Pancakes

2 1/4 cups whole wheat flour
3/4 cup wheat germ
3 tablespoons white sugar (I used coconut sugar)
3 teaspoons baking powder
1 1/2 teaspoons baking soda
3 cups buttermilk
3 eggs
1 tsp vanilla
1/4 cup butter, melted

In a large bowl, combine flour, wheat germ, sugar, baking powder, baking soda, and salt. In a separate bowl, beat together buttermilk and eggs. Keep the two mixtures separate until you are ready to cook.

Heat a lightly oiled griddle or frying pan over medium high heat. You can flick water across the surface and if it beads up and sizzles, it's ready!

Pour the wet mixture into the dry mixture, and then mix in melted butter last. Using a wooden spoon or fork to blend. Stir until it's just blended together. Do not over stir! Pour or scoop the batter onto the griddle, using approximately 1/4 cup for each pancake. Brown on both sides and serve hot.


Adapted from Allrecipes.com: Buttermilk Pancakes II


Please pass the butter and maple syrup! 

For more breakfast ideas, check out Breakfast Ideas Monday.

Enjoy! 
Monday, June 4, 2012

Muffin Tin Monday - June 4, 2012

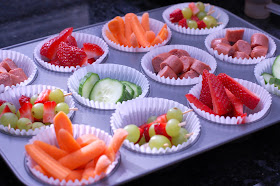
It was one of the girl's turn for Snack Day at preschool.  For some reason (again), I didn't have time to go to the grocery store and was trying to figure out what to bring to school that was dairy-free, egg-free, nut-free and wheat-free.   The ages of these preschool kids range from 2.5 years to 5 years old.   And there are some pretty picky eaters.  


For Snack Day:  baby carrots, ham roll-ups, mini fruit skewers with grapes and oranges and cucumber slices.  I also packed a container full of organic red corn tortilla chips (not shown here). 


I kept things pretty simple and the kiddies enjoyed their snack. Everything got eaten! Even the chips.  Unfortunately, 2 of my silicone muffin liners were missing.  Oh well... that means I get to shop for more cute muffin liners! 

For more great lunch ideas, visit Muffin Tin Mom!  Happy Monday!

Enjoy!


Sunday, June 3, 2012

Black Cherry Frozen Yogurt

Summer is on the brink and I realize that I still have some frozen fruit in the freezer.  Time to use them up and make room for the new summer offerings!


When I pulled out some frozen cherries, I thought why not make black cherry frozen yogurt?  Inspired from my friend's Facebook status that she took her kids to Pinkberry (a frozen yogurt shop), I thought that it was time to yank out the ice cream maker and churn something yummy. I have never gone to Pinkberry but I'm sure the family would enjoy some homemade frozen yogurt.


Last summer, I bought an extra bag of cherries on sale and pitted them with a cherry pitter.  A cherry pitter makes life so much easier!  I bought the OXO brand from Winners, several years ago.  I have also seen it at my local kitchen specialty store.  I would consider this a great tool for the foodie kitchen.  The taste of fresh pitted cherries is incredible!  The pits are a distraction... and I can easily pit them and cut them in half for the kiddies to enjoy.  


The cherry goes into the stainless steel cavity and squeeze the black handles like a stapler. 


I placed the pitted cherries flat on a parchment lined tray in a single layer.  When frozen, simply place them in freezer storage bags for future use.  Very simple!

Black Cherry Frozen Yogurt
 
2 cups whole pitted cherries (I used thawed, frozen cherries)
1/2 cup pasteurized liquid egg
2/3 cup sugar (Next time, I will cut down to 1/2 cup sugar for that extra "twang")
1 1/2 cups plain yogurt (I used 2.5% organic plain yogurt)
1/2 cup whipping cream
1/2 cup whole milk
1/8 tsp almond extract
1 tsp vanilla extract   

Toss 2 Tbsp sugar with pitted cherries.  Refrigerate the cherries and sugar for about an hour, to dissolve the sugar in the juice.  After an hour, place the cherry mixture in a food processor or blender.  Pulse or blend the cherries to coarse chunks or to a puree, depending on your preference for big or small cherry chunks in your frozen yogurt.
 
Whisk the eggs in a mixing bowl until light and fluffy, 1-2 minutes. Whisk in the remaining sugar, a little at a time, then continue whisking until completely blended, about 1 minute more.
 
Pour in the yogurt, cream and milk and whisk to blend.  Add the cherry mixture, almond and vanilla extracts and blend again. Transfer the mixture to an ice cream maker and freeze following manufacturer's instructions
Makes about 4 cups.   


Next time, I will decrease the sugar down to 1/2 cup to get more "twang" that frozen yogurt is famous for.  Frozen yogurt is now a hit in our household! 

Enjoy!