Pages

Wednesday, September 26, 2012

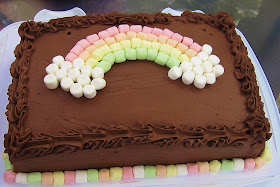
Mini-Marshmallow Rainbow Cake with Chocolate Whipped Cream Frosting

My youngest had her 3rd birthday party this weekend.  Where did the time go?  She wanted chocolate cake for her birthday so I used my tried and true chocolate cake recipe.  I scaled the recipe 1.5 times to make a 2-layer 9"x13" cake.  I thought that a Mini-Marshmallow Rainbow Cake with chocolate whipped cream would be really cute for a preschool birthday party.  


It was a fun cake to put together when the children were in bed!  Growing up, I was never the artistic type. I can't draw but I can pipe borders and put stuff on a cake.  The mini-marshmallows made the cake so cute! I was even able to hide my messy icing skills with a border of marshmallows on the bottom of the cake.    

My kiddies do not like buttercream frosting.  They complain that it is too sweet but they adore whipped cream.  I knew the cake was a hit when the kiddies inhaled their cake and asked for a seconds before everyone had their first piece!  

This chocolate whipped cream is a variation of my vanilla whipped cream.  I was inspired by our local Swiss bakery's chocolate mousse cake:  chocolate sponge cake with chocolate mousse filling.  This is my basic chocolate whipped cream recipe.  Sometimes I use a tablespoon more icing sugar if the cocoa powder is bitter or strong.  It depends on the brand of cocoa powder and how sweet/bitter you like the frosting.  I always taste and adjust the frosting to make sure it is not too bitter.  I made and decorated the cake the night before.  I noticed that the cocoa made the frosting look darker the next day.  


Chocolate Whipped Cream Frosting

1 cup heavy cream
3 Tbsp. cocoa powder
1/2 cup powdered/icing sugar (or to taste)
1/2 tsp. vanilla

Beat heavy cream, icing sugar, cocoa powder and vanilla in chilled medium bowl with electric mixer on high speed until soft peaks form.  (I beat the cream until it it looks stiff enough to pipe, being careful not to over-whip.)

Betty's Tip: Well-chilled cream will whip the best, so keep it refrigerated until ready to use. It also helps to chill the bowl and beaters before you begin. When the cream begins to thicken as you beat it, reduce the mixer speed so you can watch carefully and beat just until soft peaks form. Overbeaten cream will look curdled.


- Adapted from Betty Crocker's Sweetened Whipped Cream 

Be careful not to over beat the whipped cream,  it might turn into butter!  I like using icing sugar because it has cornstarch in it.  The cornstarch helps stabilize the whipped cream so it can retain its shape when piped.   

To frost a 9x13 double layered cake:

I always make the chocolate cream in two batches.  I found that I can only whip no more than 1.5 cups of heavy cream at a time for best results in my KitchenAid stand mixer.  Also, whipped cream melts quick in a hot kitchen!  

The first batch: 1.5 cups heavy cream, 4.5 Tbsp cocoa powder, 3/4 cup icing sugar and 3/4 tsp vanilla.  After I filled and frosted the first batch, I put the cake in the refrigerator while I make the second batch.

Second batch:  1 cup heavy cream, 3 Tbsp cocoa powder, 1/2 cup icing sugar and 1/2 tsp vanilla.  It makes enough cream to frost the rest of the cake and pipe a border around the perimeter.  


The cake was a hit!  I served each piece of cake with an extra handful of mini marshmallows.  
My birthday girl was soooo happy!  Happy 3rd Birthday, Sweetheart!  

Enjoy!

Sunday, September 16, 2012

Muffin Tin Monday - September 17, 2012

Am I the only one still struggling to get in that "back to school" routine?  It was Nessa's turn to bring a snack to share with her class.  In my classic "rummage through the fridge and pantry" style, I wanted to throw something together for everyone to enjoy.  Normally, I plan the night before but I got lazy and made it right before she left for school!  With only a handful of different items left in the fridge, I lucked out that this muffin tin snack turned out so cute and colourful! 


Today's snack:  juicy strawberries, shiny grape tomatoes, diced cheese sticks, chocolate and pizza flavoured Goldfish crackers, diced farmer's stix (mild pepperoni), red pepper sticks, cucumber bear cut-outs and crunchy green grapes.  

My middle child attends the Kindergarten program at our local Montessori Academy.  My preschooler is there too, so I tried to make this appealing to the 3-5 year age group. 


I think I have most of the food groups covered... some fruit, veggies, dairy, meat, grains and a little chocolate... hahaha, am I the only one who thinks chocolate is a food group? 

For more great lunch ideas, visit Muffin Tin Mom!  Happy Monday!

Enjoy!

Wednesday, September 12, 2012

Whiskey Rum Barbecue Ribs

The past few weeks, pork ribs were on sale at the supermarket.  Baby back ribs cost a little more since they are very tender and meaty.  They were about CAN$5.49/lb, roughly $9 per rack. Last week, I was able to score CAN$1.99/lb for regular side pork ribs which were about $4 per rack!  Very delicious!


I love ribs.  I love getting my fingers messy.  I love the sweet and sticky rib sauce... I love that  "fall of the bone" experience when you take a bite and the meat simply falls apart... 

I was never able to get my ribs to "fall off the bone" until I removed the tough back membrane behind the bones.  This membrane is very tough and takes a long time to break down in cooking.  Doing this step made the ribs very tender.  Yes, it is extra work, but so worth it!  


I used a small sharp knife and trimmed the membrane off.  You can also rip this slippery membrane off with your hands and paper towel.   


In a rush?  You can also perforate the membrane with a knife so it can cook down better.  If I have the time, I prefer to cut away the membrane. 

Some people swear by boiling ribs.  My problem:  my pot is not big enough to boil several racks of ribs for an hour or so.   Instead, I use the oven and slowly roast them over low heat in aluminum foil.  While the fat melts out of the ribs, the flavour stays in the meat and not in the boiling water.  I can easily make ribs for a large crowd with this method.  


Double wrap the ribs in foil and bake for 2 1/2 hours at 275F.


Put the sauce together while the ribs are baking.   The original recipe calls for rum. When I ran out of rum, I used tequila and whisky with no complaints. A nice dark ale or beer (Guinness) would be tasty too.  The possibilities are endless!  Also, you can use your favourite salsa. We prefer mild salsa.  If you like medium or hot/spicy salsa, feel free to use it!


Let the sauce sit for a bit so the brown sugar can dissolve. 


After 2.5 hours in the oven, remove from foil and transfer the ribs to a container or pan.  


Coat the ribs with sauce and marinate at room temperature for 1 hour, or overnight in the refrigerator.  I usually make this the day before and marinate overnight.


You can use the BBQ to finish the ribs.  I usually use the oven for easy cleanup.   Place the ribs on a parchment lined pan and bake for 30 minutes.  Baste with the marinade every 10 minutes.


Remove from oven and let the ribs rest for a few minutes.  They will be easier to cut when they cool down a little. 

Whiskey Rum Barbecue Ribs

The original recipe makes a lot of sauce for 4lbs, so I scale it down a little and it makes just enough sauce for basting in the oven or BBQ.

4lbs pork spare ribs, or 2 racks baby back ribs
1 cup brown sugar (I use 3/4 cup)
1/4 cup ketchup (I use 3 Tbsp)
1/4 cup soy sauce (3 Tbsp)
1/4 cup Worcestershire sauce (3 Tbsp)
1/4 cup rum (3 Tbsp rum.  I like a combination of 2 Tbsp rum, 1 Tbsp whiskey)
1/2 cup chile sauce (I use 1/2 cup favourite salsa)
2 cloves garlic, crushed
1 teaspoon dry mustard (I use 3/4 tsp)
1 dash ground black pepper

Preheat oven to 275 degrees F (175 degrees C).  Cut spareribs into serving size portions or leave rack whole.  Wrap in double thickness of foil and bake for 2 1/2 hours.  

In a bowl, mix together brown sugar, ketchup, soy sauce, Worcestershire sauce, rum, chile sauce, garlic, mustard and pepper.  

Unwrap and drain drippings.  Place ribs in large roasting pan.  Coat ribs with sauce and marinate at room temperature for 1 hour, or refrigerate overnight.  

BBQ method:  Preheat grill for medium heat.  Position grate four inches above heat source.  Brush grill grate with oil.  Place ribs on grill, and cook for 30 minutes, basting with marinade every 10 minutes.  
Oven method:  Preheat oven to 350F.  Bake for 30 minutes, basting with marinade every 10 minutes.  


MMmmmm.... My dinner:  a nice green salad with chicken and RIBS!  My youngest couldn't get enough of them! 

Enjoy!

Thursday, September 6, 2012

Back to School Bento Lunches

Today is an exciting day!  My 7-year old is starting Grade 2, my almost 5-year old is in Kindergarten and my almost 3-year old will be in half day preschool!   

I have to get back into the routine of making three lunches again!   Our mornings are busy enough trying to get all three out of bed, dressed, fed and out the door.   To save a bit of time (and headache), I make the kiddies' lunches the night before.  When they are all in bed, that's when I have a bit of fun getting their lunches assembled.


Fresh, beautiful and colourful finger foods in little portions separated by square silicone muffin liners really help focus the children during lunch.  They are at the age where they love their fruits, veggies and sandwiches cut in fun and different shapes.  Cookie cutters of different sizes are great.  Nowadays, I use my cookie cutters more for lunches than making cookies! 

My 7-year old son is growing up.  He doesn't want his sandwich to be cut in cutesy shapes.  Easier for me!  I wanted to establish a positive experience with food. In the mornings, I let him take a peek of what he will enjoy for lunch. 

I am lucky that my older children eat sandwiches now.  They are not big sandwich eaters but I keep trying, as they are easy to make.  Like a "Subway Sandwich Artist", it really helps to ask them what they like!  At first they only wanted ham.  Then they were OK if I added a little mayo with their ham.  Now, they like tomato slices (the wet seeds removed) with their ham and mayo!  I am patient.  In the near future, I plan to add some thinly sliced cucumber or lettuce... and then cheese... and maybe bacon?  For us, the trick is introducing one new food slowly.


Mini-fruit skewers on tooth picks are also a huge hit!  Juicy sweet blueberries, diced strawberries and grape halves were used today.  

Veggies: cucumber slices cut out in stars, red pepper stars

Sandwiches:  ham and tomato with mayo.  The sandwiches were cut out with a sandwich cutter, cake decorating sprinkles were used for the faces, and a candy food pick to keep the ham and tomato from falling out!


My son's lunch is ready to go!  A few whole wheat Triscuit crackers and a tube of yogurt for recess break.  For food safety, an ice pack will keep things nice and cool til lunch.


I was able to find some little ice packs from a different container, so I slipped those into a shelf on their sandwich boxes.  


All packed and ready for school! 


My gorgeous little boy is so excited to see his friends today!


The girls are ready for Montessori Kindergarten and Preschool!

For more great bento lunch ideas, check out Bento Lunch
Have a wonderful day!

[Sept.7, 2012 Edited to add:]  I'm proud to share the news that my article on Back to School Bento Lunches has been featured on www.SayItCanada.ca!  

Enjoy!

Monday, September 3, 2012

Fluffy Cooked Flour Buttercream Frosting

Lately, the kiddies have been complaining that frosting/icing on cakes have been too sweet.  I am glad that they told me.  It explains why they only eat two bites of a store-bought cake and leave the rest for me and hubby to finish.  It is a difficult task when we go to birthday parties, and my 3 kiddies leave their barely touched cakes for me to finish! 


It was so nice to stumble across "the Perfect Cupcake Frosting and Filling" from OurBestBites. This cooked flour frosting uses considerably less sugar (1/2 cup) than conventional buttercream (about 2 cups).  I had to try it!  It is very fluffy and not too sweet.  It is best made fresh to preserve its creamy fluffiness.  If refrigerated, the butter content will solidify in the fridge, and the frosting will get firm.  It didn't bother us, as they were quickly devoured cold from the fridge without any complaints. 

A cooked paste (roux) is made from flour and milk over the stove and then cooled.


The milk and flour was cooked over the stove over medium heat. Make sure there are no lumps.  Notice how runny it is.  


When the flour gets cooked, it becomes a thick paste.  Remove from heat and place in a bowl to cool. 


Cover the flour paste with clear plastic wrap and refrigerate to prevent the being formed on top.  Make sure it is completely cooled so the butter will not melt when it is added.   The cooled flour/milk paste is added to butter and sugar and then it is whipped for approximately 6-8 minutes until a fluffy frosting develops.


Instead of vanilla extract, I used lemon extract and a few drops of yellow food colouring.  I piped this frosting with a Wilton 1M tip on top of a simple vanilla cupcake.  I knew it was pretty good when the kiddies inhaled their cupcakes and my son wanted another one!  I asked him if it was too sweet and he said it was "SO GOOD"! 

[edited January 16, 2013] By request, I pulled out my digital scale and converted my Canadian "cup" measurements to weight in grams and ounces.  The recipe below has the ingredients by weight now!  

Fluffy Cooked Flour Buttercream Frosting
- lightly frosts 12 cupcakes 

3 tablespoon all-purpose flour, plain flour
1/2 cup homo milk (I used 1%)
1/2 cup butter (I used 1/3 cup)
1/2 cup granulated (caster) sugar (not powdered sugar) (I used 1/3 cup)
1 teaspoon vanilla extract or other flavour you wish (I used lemon extract)
- optional food colouring (I used 2 drops of yellow)

OR

Converted the recipe to units by weight:
3/4 oz (23g) plain flour
4 oz (110g) full-fat milk (I used 1%)
4 oz (110g) butter (I used approx 65g)
3 1/2oz (95g) caster sugar (not powdered sugar) (I used 65g)
1 teaspoon vanilla extract or other flavour you wish (I used lemon extract)
optional food colouring (I used 2 drops of yellow)

Whisk together the flour and the milk. Heat in a small sauce pan on medium heat.
Whisk continuously until it starts to thicken. Let it cook, while stirring with a rubber spatula, until you can start to see the bottom of the pan.   Continue to cook until mixture has the consistency of thick pudding or paste.

Put  mixture in the fridge and let it cool completely, it’s fine if it stays in there long enough to get chilly, you just don’t want it warm at all. As it’s cooling, feel free to stir it occasionally to speed up the process and keep it from forming a crust on top.

It an electric stand mixer, beat the butter and the sugar for a minute or two until well combined and fluffy. You’ll want to use the whisk attachment on a stand mixer if you have one, instead of the flat paddle. Then while beating, add in the thickened milk mixture and the vanilla. Beat to combine and then scrape down the sides. Mixture will separate and look messy, keep beating!  Continue beating until mixture comes together and is light and fluffy, about 7-8 minutes, but time varies.  Take a sample of frosting between your fingers; frosting is done when light and fluffy and sugar granules are dissolved.

- Adapted from "Our Best Bites:  the Perfect Cupcake Frosting and Filling".  


 Enjoy!

Easy Vanilla Cupcakes

It has been an extremely busy summer and I haven't had much opportunity to bake.  Much of our time this summer has been devoted to being outside in our garden or visiting friends and relatives in Vancouver.  With the hot weather, the kiddies were very happy with homemade ice cream and frozen fruit as a treat!


However, Mommy had a craving for vanilla cupcakes today. And they had to be easy to make! 

This recipe is an adaptation of my favourite yellow cake recipe from my Betty Crocker Cookbook.  I halved the recipe, decreased the sugar and doubled the vanilla.  It is an easy no-fuss recipe with basic, simple and readily available ingredients.  The texture of the cupcake is light, fluffy and does not fall apart, like regular boxed cake mixes. I think the trick is beating the batter on high for 3 minutes.


The batter is a little runny.  Also, there is only enough batter to fill about 1/2 the cupcake liner.  Don't worry, it rises to a full-sized cupcake once baked.  

When I *tried* to sample one plain cupcake, the kiddies accosted me and all that was left was the paper liner and a few crumbs!  They loved the cupcakes plain and didn't care whether I frosted them or not.


Lately, my two older children have been telling me that commercially flavoured yogurt, cookies and cakes are too sweet!  Music to my ears!!  With this feedback, I decreased the sugar to 1/2 cup and no complaints! 


I topped these cupcakes with a lower-sugar, light and lemony frosting.  They didn't last 24 hours...  I think they would be great made in advance and frozen for future use. 

Easy Vanilla Cupcakes
- makes 12 regular/muffin sized cupcakes

1/4 cup butter, softened
1/2 cup to 3/4 cup sugar (I used 1/2 cup) 
2 eggs
1 cup all-purpose flour
1/4 tsp salt
2 teaspoons baking powder
1/2 cup milk (I used 1%)
1 teaspoon vanilla

Preheat oven to 350 F.

Line cupcake pan with cupcake liners

Cream butter and sugar together.  Dump the rest of the ingredients with electric mixer on low speed 30 seconds, scraping bowl constantly.

Beat on high speed 3 minutes, scraping bowl occasionally;fill cupcake liners around 1/2 full. 

Bake cupcakes for 12-15 minutes until toothpick inserted in center comes out clean or until cake springs back when touched lightly in center.

Remove cupcakes from pan and cool on wire rack.  Cool completely.   Frost as desired.

- From Betty Crocker's Cookbook: Everything You Need To Know To Cook Today


Enjoy!