Tuesday, December 17, 2013

Easy Eggless Fruitcake Slice and Bake Shortbread Cookies - with Gluten-Free and Vegan option

Christmas baking will never be the same in my household.  Now that I have food allergies/sensitivities, I include gluten-free and vegan baking into my repertoire.  So far, I have had very good luck choosing recipes to try. 


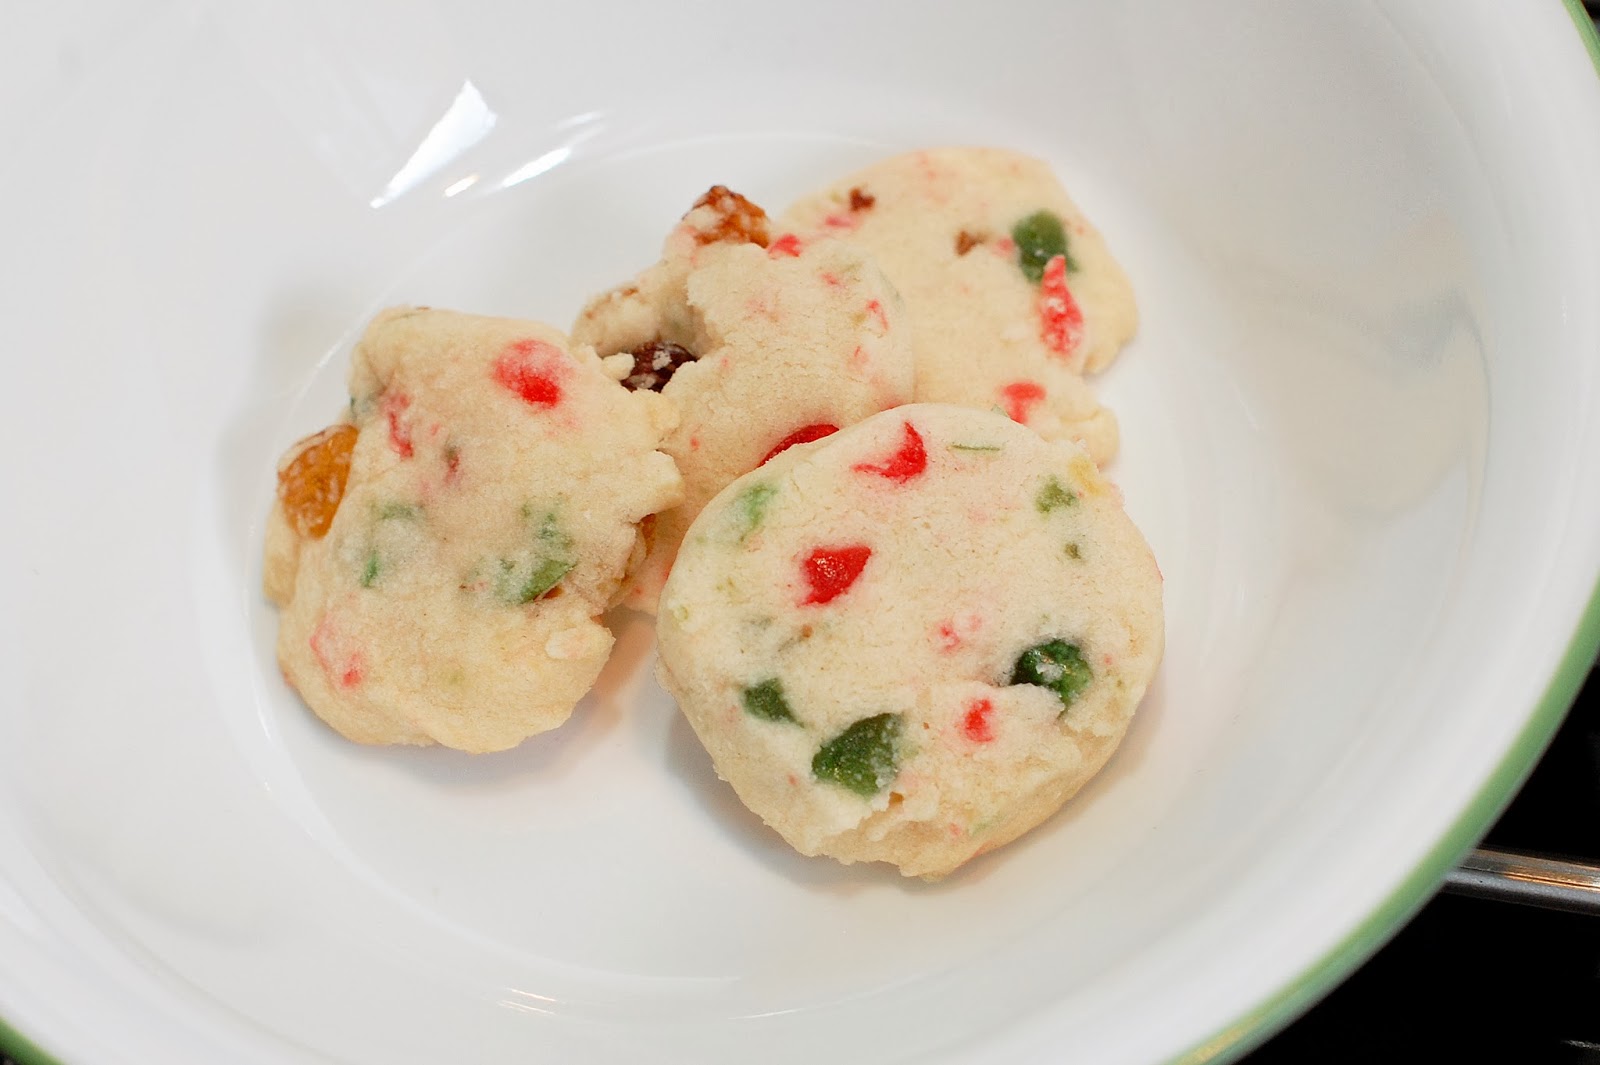
Here is the gluten-free and vegan version of a classic:  slice and bake shortbread cookies.  I came across this recipe for Eggless Tutti Fruitti CookiesI didn't have "Tutti Fruitti" mix but it's the same as chopped glace fruit used in fruitcakes.  I even added yellow and dark raisins into the mix.  For those that are not keen on glace fruit, you can use dried chopped fruit such as raisins, apricots, dried cranberries, dried cherries or dates.  The possibilities are endless!  

Eggs are an important binder used in gluten-free baking but alas, there are people who cannot use eggs.  Since this recipe is already eggless, I know that the dough would hold.  

The replacements used in gluten-free and vegan baking differ with respect to mouthfeel, texture, taste and presentation.  It is a precious treat for those who can enjoy something equivalent to a classic recipe.   

My tip for gluten-free and vegan baking:  replace the wheat flour with all-purpose gluten-free flour in vegan recipes.  The recipes are already egg-less and dairy-free!  I simply peruse the vast number of vegan (dairy-free and egg-free) recipes and replace the wheat flour with an all-purpose gluten-free flour blend.  

I am in the middle of experimenting with a box of King Arthur Flour's Gluten-Free Multi-Purpose Flour Mix.  I bought in on sale during my trip to Hawaii.  Basically, it is a mix of white and brown rice flours with tapioca and potato starch.  You can easily find recipes online to mix your own favourite gluten-free flour. It doesn't have a I like Sarah's Gluten-Free Flour Blend recipe


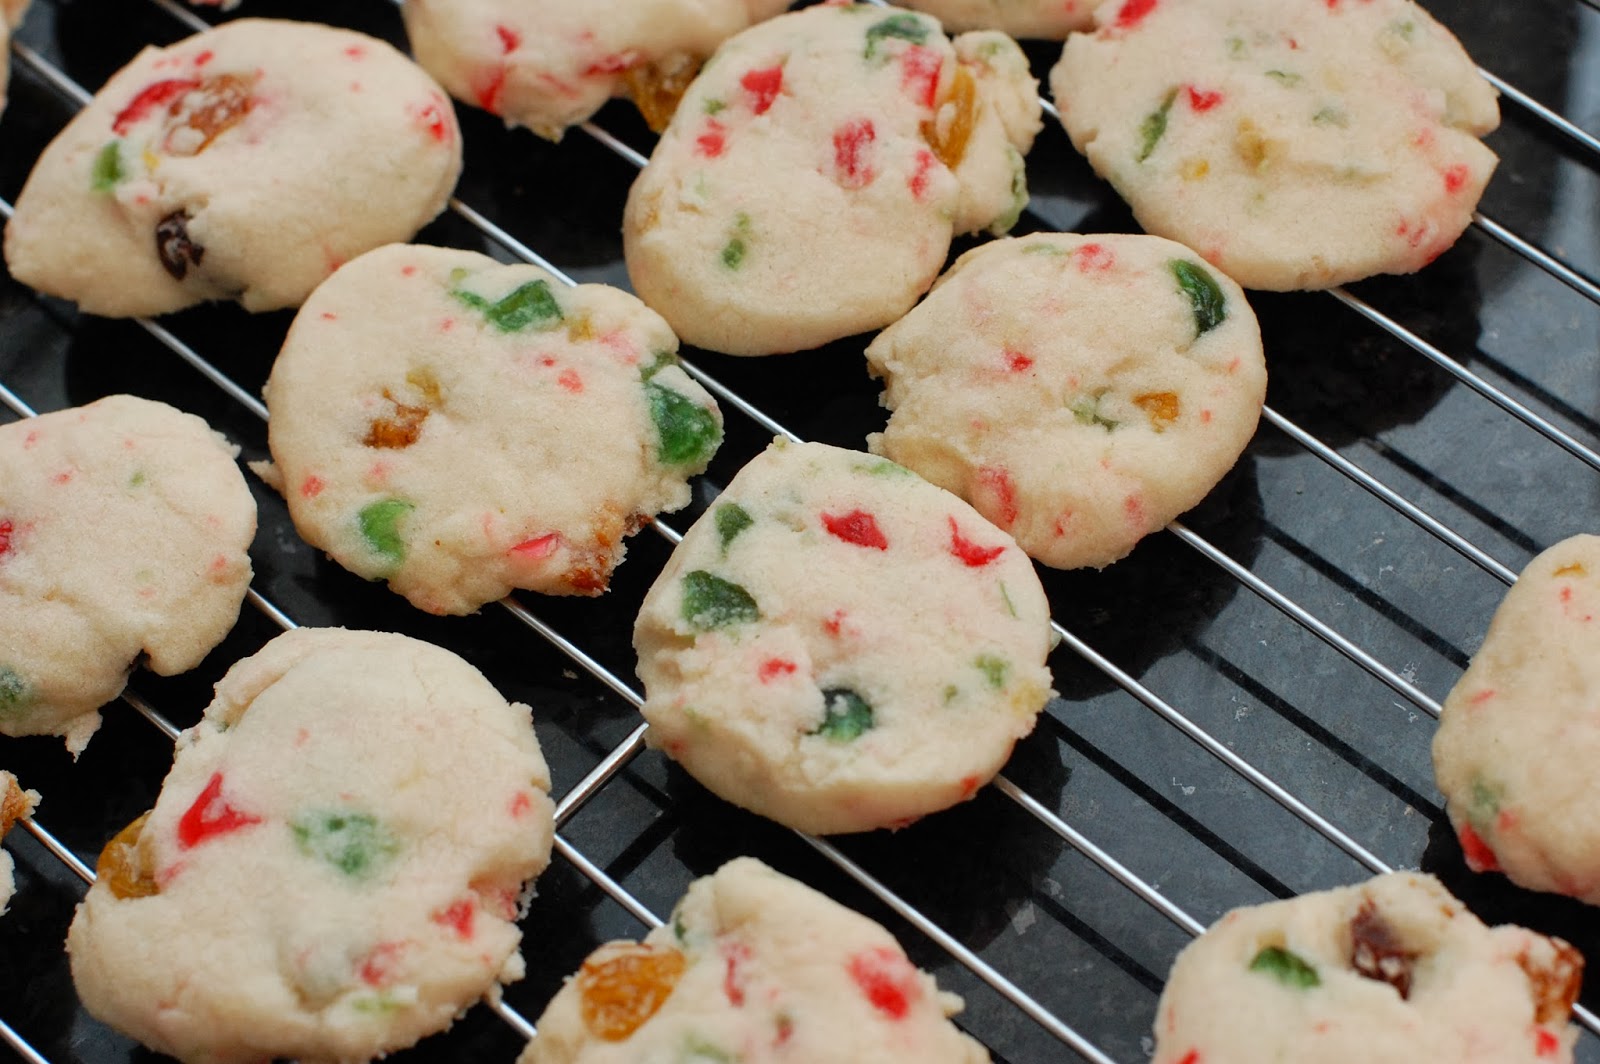
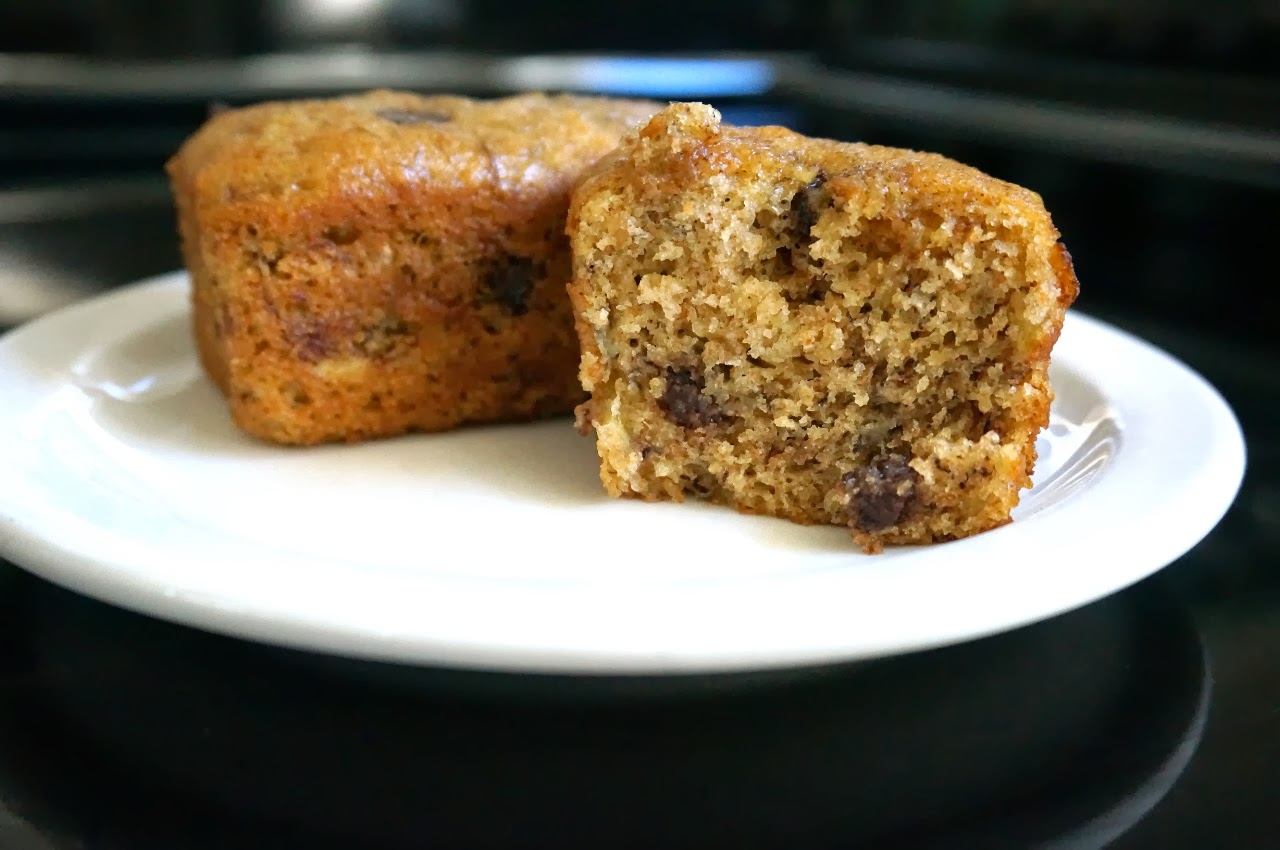
After freezing the dough logs overnight (optional), the dough was a little crumbly when I sliced it for baking.  Luckily, I was still able to press the dough together into each cookie with success!  Next time, I may add a bit of vanilla and almond extract, as my classic fruitcake recipe has amaretto in it.  In addition, I have made this recipe with all-purpose wheat flour and butter with no complaints.  

Easy Eggless Fruitcake Slice and Bake Shortbread Cookies - Gluten-Free & Vegan option
makes about 2 dozen

1 cup all-purpose flour, gluten-free* or wheat
*1/4 tsp xanthan gum if your gluten-free flour blend does not have a stabilizer/binder
1/3 cup softened butter or vegan butter/margarine 
1/2 cup icing/powdered sugar
1/3-1/2 cup Deluxe holiday mix, glace red & green cherries or a mixture of your favourite dried fruit bits (e.g. yellow/dark raisins, apricot, prunes, dried dates, dried cherries or dried cranberries)  
1 to 2 Tbsp water or milk (Use only as needed.  I used water.  For gluten-free flour, I only needed a splash to get the dough to bind.  For all-purpose flour, I needed the full 2Tbsp water) 

Beat softened butter with icing/powdered sugar until light and fluffy.  Stir in flour and fruit mix.

Add enough milk/water to form a soft dough.  Shape into log,  wrap with plastic wrap or parchment paper and freeze for 40 minutes to firm up.  (I have found that freezing the dough is not necessary, but if your dough is very soft, freezing it would help make the dough easier to slice.)

Slice logs into about 1/4" thick slices.  If the dough crumbles, press the dough into each cookie.  Bake about 10-12 minutes in preheated oven 350F.  

- Adapted from Sharmis Passion's:  Eggless Fruit Cookies/Tutti Fruitti Cookies


Fruitcake cookies made with Deluxe Holiday Mix, all-purpose wheat flour and butter.  
I am pretty amazed how versatile and forgiving this recipe is with the substitutions made!  I have a few days left before Christmas to get things in order.  I'm trying not to stress.  I just do my best and trust that somehow everything will fall into place. 


Enjoy!
Pin It

Thursday, December 12, 2013

Reduced Sugar Cranberry Butter Tart Squares

It has been so long since my last post!  I was extremely busy in October and November and didn't have time to blog.  Also, we just got back from my brother's dream beach wedding in Hawaii last week.  Trying to adjust from Honolulu's +30C to 100 Mile House's -30C weather was quite a shock now that we are back home!  

Luckily, it's -2C and I'm finally starting to get into the Christmas baking season!


With a few basic ingredients, I wanted to make something fast, easy and buttery but not too sweet.   The cranberry butter tart squares were inspired by this reduced sugar butter tart squares recipe.  Butter tart squares are a great addition to any Christmas cookie platter.  

I used dried cranberries when I didn't have enough raisins.  Hubby said that they were the best butter tart squares I have ever made!  The tanginess of the dried cranberries made the squares less sweet.  Substituting with alternate ingredients can create something even better!  

This recipe has eggs, butter and gluten.  I plan to create a gluten-free and vegan equivalent of this recipe later on so I can eat them too!  

Reduced Sugar Cranberry Butter Tart Squares
makes 1- 9"x13" pan

Crust:
2 cups all-purpose flour
1/2 cup granulated sugar 
cup butter

Topping:
1/4 cup butter, melted
4 eggs,  lightly beaten
2 cups light brown sugar (I used only 1 1/4 cup!)
1/4 cup all-purpose flour
1 tsp baking powder
1 tsp vanilla
2 pinches salt
3/4 cup raisins
3/4 cup dried cranberries (instead of 2 cups raisins)
1 cup coarsely chopped pecans (I omitted)
optional:  powdered/icing/confectioner's sugar

In bowl, combine flour with sugar; with pastry blender, cut in butter until crumbly. Press into 9x13-inch pan; bake in 350°F (180°C) oven for 15 minutes.

Topping: In bowl, mix together butter and eggs; blend in sugar, flour, baking powder, vanilla and salt. Stir in raisins and pecans; pour over base.

Bake in 350°F (180°C) oven for 20 to 25 minutes or until top springs back when lightly touched. Let cool on rack. (Make-ahead: Wrap and refrigerate for up to 4 days or overwrap in heavy-duty foil and freeze for up to 2 weeks.) Cut into squares.

Optional:  dust with powdered icing sugar right before serving for prettier presentation. 

- Adapted from Canadian Living Magazine: July 2009


Enjoy!

Pin It

Tuesday, October 1, 2013

Fluffy and Moist Sour Cream Banana Bread (Whole Wheat option)

This morning, I volunteered for the "Breakfast for Learning Program" at my older kiddies' elementary school.   Through generous donations from the community, school and the Parent Advisory Committee (PAC), our children's school can offer a simple breakfast for those who come to school hungry.  The PAC helps purchase and provide juice, milk, yogurt, cereal bars, cinnamon buns and muffins.  Depending on the volunteer, someone can make pancakes or waffles for a hot breakfast!  

  
Since this was my first gig for the year, I simply set out the usual milk, fruit, juice and store bought bran muffins.  To test the waters, I also brought a batch of my sour cream whole wheat banana bread.  I made them into mini muffins, mini loaves and a big loaf.  I was OVERWHELMED by the response!  When I ran out of mini muffins, I cut up the last loaf and it was GONE IN SECONDS.  Wow.  

This is another one of those recipes that I have been using for over 10 years.  Great for gift-giving and Christmas.  I think the secret is the moistness and fluffiness from the sour cream. 

What can a creative mom do to get school kids try whole wheat banana bread?  For marketing purposes, I added some chocolate chip garnish, so they can try my home baked goodies.  And sprinkled a wee bit of cinnamon sugar on top... I got rave reviews!!!  No one noticed that I used half whole wheat flour in the recipe.  


Fluffy and Moist Sour Cream Banana Bread
makes 4- 7"x3" loaf pans

3/4 cup butter (I used non-hydrogenated soft margarine)
3 cups white sugar (I decreased to 2 1/2 cups)
3 eggs
6 very ripe bananas, mashed (I used 5 large ripe bananas)
1 (16 ounce/2 cup) container sour cream (I have used light sour cream, plain yogurt and combination of both)
2 tsp vanilla extract
2 tsp cinnamon
1/2 tsp salt
3 tsp baking soda
4 1/2 cups all-purpose flour (2 cups whole wheat flour + 2 1/2 cups all-purpose flour)
1 cup chopped walnuts, optional (I used chocolate chips in the batter + on top instead)

Preheat oven to 300F.  Grease four 7x3 inch loaf pans.

In a large bowl, cream butter and sugar.  Mix in eggs, mashed bananas, sour cream, vanilla and cinnamon.  Mix in salt, baking soda and flour.  Stir in nuts (or chocolate chips, if desired). Divide into prepared pans.

Bake for 1 hour, until a toothpick inserted in center comes out clean.

Note:  I have baked this as mini muffins, muffins, mini loaves and in loaf pans.  It is a very flexible recipe that can handle substitutions and changes, if needed.  I have also baked this at 350F for mini muffins and mini loaves.  Please check the times accordingly so you don't overbake!  


Mini muffins made without any nuts or chocolate chips. 


I had to promise the school kids that I will bring more next time!  I couldn't cut my last loaf fast enough for them!  That is the biggest form of flattery for this mom!  They really made my day.

Have a wonderful day!

Enjoy!
Pin It

Friday, September 27, 2013

Easy Buttery Garlic Bread Spread (Garlic Butter), Vegan or Not

My kiddies adore garlic bread!  I had to write this recipe down for them, as I know that they will want to make it just "like mom's".  
Garlic toast hot dog buns 

At my local Canadian grocery store, a loaf of garlic bread (French bread spread with garlic buttery spread) costs $4.  Their garlic spread has a very long (and unnatural) ingredient list.    

A loaf of plain French bread costs $2.  I make my own garlic bread at a fraction of the cost.  No French bread?  I toasted hot dog and hamburger buns (leftover from Baby's birthday party) with this garlic spread and my family loved it!

My kiddies loved this so much, they even had it spread on their morning toast!  

With only 3 simple ingredients, we were able to enjoy "restaurant-style" garlic bread at a fraction of the cost.  I always have dried parsley and garlic powder in my collection of spices.  


With soft non-hydrogenated margarine (I used Becel vegan) or softened butter, this mixes up super fast!  The dried parsley makes the garlic spread look like the ones in the restaurants.  


A great way to use up leftover hot dog buns!  Ready to be toasted in the oven.  

Easy Buttery Garlic Bread Spread (Garlic Butter), Vegan or Not
makes 1/2 cup garlic butter

1/2 cup softened butter or vegan non-hydrogenated margarine (I used Becel vegan)
1 1/2 Tbsp garlic powder* (I tone it down to 1 Tbsp)
1 Tbsp dried parsley
optional:  your favourite shredded cheese

Mix softened butter or margarine, garlic powder and dried parsley together in a bowl.

Spread on your favourite bread (and add shredded cheese, if desired) and bake in hot 375F oven for about 3 minutes or broil until golden brown.  

*I think grated or finely minced fresh garlic would be great.  Just add to taste.  

- Adapted from Allrecipes.com: Great Garlic Bread


Leftover hamburger buns?  Make garlic toast hamburger buns!

Enjoy!
Pin It

Thursday, September 26, 2013

Fluffy Reduced Sugar Whipped Vanilla Frosting, Gluten-free, Vegan or Not

It was officially my youngest's 4th birthday yesterday.  I thought it would be nice to bring some cupcakes to celebrate her special day at preschool.


This reduced sugar frosting on top of some simple white cupcakes turned out great! Just found out that all but one little preschooler ate the whole thing!  The little one just licked all the frosting.  I consider that a success!  I strive to make our goodies less sweet, which is a good thing for the kiddies.  My son often complains that the commercial bakeries make their frostings too sweet and he loves this "less sweet" frosting.  

I had already posted this recipe earlier this week with my gluten-free vegan vanilla cupcakes, but thought it would be easier to locate in a separate entry.  I reduced the sugar content of this fluffy whipped vanilla buttercream frosting.  Next time, I think I could try decrease a little more sugar and less liquid.  


Fluffy Reduced Sugar Whipped Vanilla Frosting 
generously frosts 12 cupcakes

1/4 cup nonhydrogenated shortening
1/4 cup nonhydrogenated margarine or butter
1 1/4 cup powdered sugar, sifted if clumpy
3/4 teaspoon vanilla extract
1 Tbsp milk of your choice, dairy or not

Beat the shortening and margarine together until well combined and fluffy. Add the sugar and beat for about 3 more minutes.

Add the vanilla and milk and whip for another 5 to 7 minutes until fluffy.  (I have a KitchenAid stand mixer and I like to change from the paddle attachment to the wire whip attachment for a lighter, fluffier frosting).  

Using a piping bag and 1M Wilton tip, I was able to generously frost 12 cupcakes with leftovers.  The key to this frosting is to whip it so full of air that becomes fluffy and not so sweet.

Since I decreased the sugar, the liquids should be adjusted accordingly to maintain some stiffness for piping.  I think you could even omit the milk for a stiffer frosting.  It will firm up in the refrigerator, as the non-hydrogenated fats are heat sensitive.  


The last 3 cupcakes before the kiddies inhaled them!

Enjoy!
Pin It

Tuesday, September 24, 2013

Gluten-Free Vegan Vanilla Cupcakes with Fluffy Reduced Sugar Vanilla Frosting, Version 2 - Egg-free, Dairy-free, Nut-free

I'm happy with this batch!  Soft, fluffy, moist and not gummy when taken out of the oven.  I couldn't help myself.  I *inhaled* the first one.  The true test:  I wanted another one.  Most of the time, I have a bite and then let the kiddies finish it.  I was sure glad the kiddies were still in school so I could have my (short-lived) moment with this cupcake.   


I used my favourite vegan vanilla cupcake recipe and substituted with Sarah's gluten-free flour blend (with the white rice substitution instead of sorghum flour for a lighter cupcake).  Previously, I used a different blend for my "Version 1" GF vegan vanilla cupcakes but they came out a little too moist and slightly gummy.  The kiddies didn't complain!  

I baked it for 3 minutes longer than specified by the original vegan (all-purpose flour) recipe and there was no gumminess (common with gluten-free baking and xanthan gum). 

It was so good I had to write it down!  If you are not gluten-free, you can use 1 1/4 cup all-purpose flour + 2 Tbsp cornstarch in place of the brown/white rice flour, potato starch, tapioca starch, and xanthan gum.  

Gluten-free Vegan Vanilla Cupcakes,  Version 2
makes 12 regular cupcakes

1/2 cup milk of your choice (I used unsweetened Coconut Dream)
1/2 cup water
1 tsp lemon juice
3/4 cup sugar
1/2 cup + 2 Tbsp brown rice flour (I used Bob's Red Mill brand)
1/4 cup white rice flour (I used an Asian brand, super finely milled)
1/4 cup potato starch
1 Tbsp tapioca starch
3 Tbsp cornstarch
1/2 tsp xanthan gum
3/4 tsp baking powder
1/2 tsp baking soda
1/2 tsp salt
1/4 cup canola oil
1 tsp vanilla extract
1/8 tsp almond extract (optional)

Preheat oven to 350 degrees. Line muffin pan with cupcake liners.

Whisk the vegan milk and vinegar or lemon juice in a measuring cup and set aside for a few minutes to get good and curdled.

Beat together the vegan milk mixture, oil, sugar, vanilla, and other extracts, if using, in a large bowl. Sift in the flour, cornstarch, baking powder, baking soda, and salt, and mix until no large lumps remain.

Fill cupcake liners half-way and bake for 20 to 22 minutes. Transfer to a cooling rack, and let cool completely before frosting.

My own notes:  I baked for 25 minutes, maybe I'll try 24 minutes next time.    


Fluffy Reduced Sugar Vanilla Frosting 
generously frosts 12 cupcakes

1/4 cup nonhydrogenated shortening
1/4 cup nonhydrogenated margarine
1 1/4 cup powdered sugar, sifted if clumpy
3/4 teaspoon vanilla extract
1 Tbsp milk of your choice, dairy or not

Beat the shortening and margarine together until well combined and fluffy. Add the sugar and beat for about 3 more minutes.

Add the vanilla and milk and whip for another 5 to 7 minutes until fluffy.  (I have a KitchenAid stand mixer and I like to change from the paddle attachment to the wire whip attachment for a lighter, fluffier frosting).  

Using a piping bag and 1M Wilton tip, I was able to generously frost 12 cupcakes with leftovers.  The key to this frosting is to whip it so full of air that becomes fluffy and not so sweet.

Since I decreased the sugar, the liquids should be adjusted accordingly to maintain some stiffness for piping.  I think you could even omit the milk for a stiffer frosting.  It will firm up in the refrigerator, as the non-hydrogenated fats are heat sensitive.  


In case anyone was curious, this is what the texture/crumb looks like.  A little dense yet soft and tender.  


Enjoy! 
Pin It

Monday, September 23, 2013

Black Forest Mini Marshmallow Rainbow Cake

Wow, it has been too long since my last entry.  The summer has flown by so quick with the kiddies out of school.   At the end of July, I had eye laser surgery (PRK) to correct my nearsightedness.  It took 4 weeks to recover but it was well worth it!  

This month, it took a while to get into the rhythm of school, skating lessons, packing lunches, music lessons, church and loads of dishes and laundry!  

Black Forest Mini Marshmallow Rainbow Cake with Fresh Whipped Cream

Over the weekend, my youngest had her 4th birthday party.  I can't believe it!  My preemie baby will be turning 4 in a few days.  

We intended to have a small party with her preschool friends for 2 hours... but somehow ended up with 17 kids in our house on a rainy Saturday afternoon!  

Most of her preschool friends had siblings in the same class with my older kiddies, so they came too...and their parents.  I didn't have a headcount, but I think we had about 30 people at our home and we had a blast!     
    
Our birthday party menu included:  BBQ hot dogs, hamburgers, whiskey rum ribs (with Tanduay rum & Jack Daniels), gluten-free chicken burgers, gluten-free chicken dogs, oven roasted corn on the cob, chicken potstickers, potato salad, Cheetos, potato chips, chips & salsa, veggies & dip, fruit tray of watermelon, grapes & mandarin oranges and finally, cake! (Sorry, I was too busy hosting and forgot to take pics of all that food!)

Last year, I made a Chocolate Mini-Marshmallow Rainbow Cake and the Birthday Girl wanted it again.  To change things up, I used fresh vanilla whipped cream instead of chocolate and the cake was Black Forest Style.  

Everyone's waiting patiently for the candles and cake!
YUM!  The Black Forest Cake was a hit!  
So cute that the kiddies inhaled their first piece and came back for seconds!

I did not use any liqueur in the cake or filling since the kiddies were eating this.   I prefer to add a splash of kirsch or amaretto to the cherry pie filling for that "adult" taste. 

My KitchenAid mixer does not whip the cream stiff enough to pipe if there is too much heavy cream.  To overcome this, I whipped the cream in two small batches to get that stiff piping consistency (no more than 1.5 cups heavy cream).  Make sure your bowl and beaters are chilled, so the cream whips faster and sturdier for piping.  The cornstarch content in icing sugar helps stabilize the cream if kept cold.  

Black Forest Mini Marshmallow Cake

1 favourite chocolate cake (can be homemade or a box)*: 1 double layer 8 or 9-inch cake, 1 triple layer 8-inch cake, 1- 9x13 cake (baked in 2 pans for double layer)
1 can cherry pie filling
2 cups heavy cream (2.5 cups heavy cream for triple layer cake, 3 cups for double layer 9x13 cake)
3 Tbsp confectioner's/icing sugar  (6 Tbsp icing sugar for triple layer, 8 Tbsp for 9x13)
2 tsp vanilla (2.5 tsp vanilla for triple layer, 3 tsp for 9x13)

Prepare chocolate cake and cool completely.

Whip half the amount of heavy cream with half of the confectioner's/icing sugar and half the vanilla for at least 3 minutes on high until the cream is stiff enough for piping.  Be careful not to overwhip the cream (mixture will separate and become butter!).

Place one cake layer on a cake plate.  Spread the cake with whipped cream and spoon cherry pie filling on top of the cream, in the middle of the cake.  Add the cherry pie filling until it reaches 1-inch away from the edge.  This will prevent the cherries from oozing from the sides of the cake.  

Repeat with the remaining cake layer.  Whip the remaining heavy cream, icing sugar and vanilla.  Frost and pipe the cake as desired with the whipped cream.  Decorate with mini marshmallows, candies, shaved chocolate or your favourite cake decorations as desired.  

* I scaled 1.5X of my family's favourite chocolate cake recipe for a taller 9x13 double layer cake

Note: This can also be made in the style of "White Forest Cake" by using your favourite white or yellow cake instead of chocolate. 

The Birthday Girl with Mommy & Daddy
The Birthday Girl was EXHAUSTED, but still had enough energy to nibble on her goodie bag treats while resting... 

Happy 4th Birthday, Sweetheart! 

Enjoy!
Pin It

Thursday, June 13, 2013

Double Chocolate Chip Smarties Cookies

I wanted to bake something chocolatey!  I dug around my pantry and found a box of Smarties (candy covered chocolate buttons), random small bars of white and dark chocolate, some chocolate coins and a few Hershey kisses.  I chopped all the chocolate up and ended up with 3/4 cup of mixed chocolate chunks.  The original recipe calls for 2 cups of chocolate chips.  I didn't have enough chocolate chips, so I topped each cookie with a Smartie.  I don't think anyone noticed that I used less than half of the amount of chocolate chips!  


We had a play group last night.  I thought it would be nice to bring an after dinner treat.  Due to my food allergies, I have not tasted this recipe before!  I put all my trust onto my kiddies.  Yes, my "quality control team" consisted of a 3, 5 and 8-year old.  They said they were good and that was enough for me!  


This recipe was quick and easy to make.  The true test was when the kiddies at the play group wanted to have a second cookie right after they inhaled the first one!  I think putting a Smartie onto each cookie really added some "kiddie pizzaz" to the presentation.  

Whew!  The cookies passed "quality assurance" with flying colours! 

Double Chocolate Chip Smarties Cookies
makes about 4 dozen

1 cup butter, softened (I used non-hydrogenated soft margarine)
1 cup white sugar
1/2 cup brown sugar
2 eggs
2 teaspoons vanilla extract
2 cups all-purpose flour
2/3 cup cocoa powder
3/4 teaspoon baking soda
1/4 teaspoon salt
2 cups semisweet chocolate chips (I only used 3/4 cup mix of white, milk & dark chocolate chunks + 1 Smartie candy on top of each cookie)
Smarties, optional (1 for each cookie, if desired)

Preheat oven to 350F

In large bowl, beat butter, sugar, eggs and vanilla until light and fluffy.  Combine the flour, cocoa, baking soda and salt; stir into the butter mixture until well blended.  Mix in chocolate chips.  Drop by rounded teaspoonfuls onto ungreased cookie sheets.  (Decorate cookies with candy, if desired).  

Bake for 8 to 10 minutes in preheated oven, or just until set.  Cool 5 minutes on the cookie sheets before transferring to wire racks to cool completely.  

- Adapted from Chocolate Chocolate Chip Cookies I


We didn't have very many cookies left over.  I used a 1" cookie scoop and ended up with 56 cookies.  I brought 3 dozen to the playgroup, gave away 1 dozen and packed a few for school lunches.  After less than 24 hours, I only have 3 cookies left!  Just enough for each kiddie to enjoy after school with a cold glass of milk.  

Enjoy!

Pin It

Friday, May 31, 2013

Strawberries and Cream Chinese Bakery-Style Chiffon Sponge Cake, Gluten-free or not

We had some guests come for dinner the other night.  Hubby ordered Chinese take-out, so all I had to do was add a nice green salad (you can never get enough veggies!) and make a dessert.  


To keep with the Chinese food theme, what is a typical Chinese dessert?  For special occasions, my mother would either bake or order a beautiful vanilla chiffon sponge cake decorated with fresh fruit and whipped cream from a local Chinese bakery.   

You can use your favourite sponge cake with whipped cream and fruit.  I made 2 tube sponge cakes with this vanilla chiffon sponge cake recipe.  I decorated one cake and froze the second one to enjoy at another time for a quick dessert.   For those who are on a gluten-free diet, you can try this gluten-free vanilla chiffon sponge cake.  

Pressed for time?  Ready-made angel food cakes can be decorated fresh whipped cream and fruit.  


I usually fill and decorate these cakes with canned fruit cocktail that has been drained and blotted dry.  I have also made a "Strawberries and Cream" cake with fresh strawberries and  "Peaches and Cream" with canned peaches.  


This time, I used fresh strawberries and canned mandarin orange segments to fill and decorate the cake.  Make sure to blot dry the excess moisture from the fruit on a paper towel or napkin. 

Strawberries and Cream Chinese Bakery-Style Chiffon Sponge Cake, Gluten-free or not

1 - 8" vanilla chiffon sponge cakegluten-free vanilla sponge cake or ready-made angel food cake
1.5 cups heavy cream
4.5 Tbsp confectioner's sugar 
1.5 tsp vanilla 
chocolate shavings, with a vegetable peeler
selection of fresh/canned fruit for decorating and filling (possibilities are endless!)
  - strawberries, kiwi, grapes, melon balls, etc
  - canned fruit (must be drained and blotted dry):  peaches, pears, mandarin oranges, cherries, etc.

Prepare chiffon cake and cool completely.

Whip 1.5 cups heavy cream with 4.5 Tbsp confectioner's sugar and 1.5 tsp vanilla for at least 3 minutes on high until the cream is stiff.  Be careful not to overwhip the cream (mixture will separate and become butter!).  If you would like extra whipped cream for piping or for serving, use 2 cups heavy cream, 6 Tbsp confectioner's sugar and 2 tsp vanilla.  

Dice about 1 cup (I forgot to measure, chop enough fruit to fill the cake layer) fresh or canned fruit for filling and blot dry on paper napkin/towel.  Set aside.

Cut cake in 2 layers.  Place one cake layer on a cake plate.  Spread the cake with whipped cream and place chopped fruit pieces (blotted dry) on top of the cream. Place the top layer on the fruit filling.  

Frost and decorate the cake as desired with the whipped cream.  


The cake didn't last long!  Of course, the kiddies had leftover cake dolloped with extra whipped cream for breakfast the next day!

Enjoy! 
Pin It