Tuesday, May 15, 2012

Coffee Chiffon Rose Cake

Mother's Day weekend was lovely.  It was filled with lots of hugs, kisses, cards, presents, and time spent in the garden. 

Of course, I still had to make dinner, dessert, vacuum and wash the floors.  Nothing better to a mother than a nice, enjoyable meal and a fresh clean floor!

For dessert, I wanted to make a special Mother's Day cake.  With roses.  With coffee.  With fresh whipped cream.  Without chocolate.  In the past few months, I noticed that I was getting an allergic reaction to chocolate and cocoa.  It was enough for me to be very uncomfortable with a super itchy face after tasting the stuff.  I'm hoping that it is a temporary thing.  I developed a seafood allergy (hives) at age 16 and was somehow able to eat prawns, crab and lobster again after seven years! 

No worries, there are PLENTY of yummy things other than chocolate.  I'm patient and hopeful.  Maybe I can eat chocolate again in seven years.  In the meantime...


Here is my Rose Cake!  I was inspired by my friend's beautiful Rose cupcakes. (Thanks Q!)  I had the popular Wilton 1M star tip and the roses were very easy to pipe.  I followed I am baker's Rose Cake Tutorial and was able to make a very pretty cake with vanilla whipped cream.  I whipped the cream until it got to the stiff peak stage, about 4-5 minutes (the time depends on the brand of whipping cream, so keep a close eye). 

The coffee sponge cake recipe is from My Food Affair.  It is a very close adaptation of my  Vanilla Chiffon Sponge Cake.  With only the addition of instant coffee (I used decaf for the kiddies) and more sugar, the change was so good!  I was able to fill two 8" round pans and one angel food cake pan.  I cut up the extra cake (from the angel food cake pan) into smaller servings, wrapped them in cling wrap and then froze them in a large freezer bag to enjoy later.   

 The cake was not too sweet and the fresh whipped cream complimented the coffee flavour of the cake.

Coffee Chiffon Cake

2 cups all-purpose flour, or 2 1/4 cups cake flour
1 1/2 cups granulated sugar
3 teaspoons baking powder
1/4 teaspoon salt
4 tablespoons instant coffee
3/4 cup water
1/2 cup vegetable oil
2 teaspoons vanilla
7 egg yolks (or 5 if using cake flour)
1 cup egg whites (8 egg whites)
1/2 teaspoon cream of tartar

Move oven rack to lowest position. Heat oven to 325°F. In large bowl, mix flour, sugar, baking powder and salt. Dissolve instant coffee with 3/4 cup water.  Beat in coffee mixture, oil, vanilla and egg yolks until smooth.

In large bowl, beat egg whites and cream of tartar with electric mixer on high speed until stiff peaks form. Gradually pour egg yolk mixture over beaten egg whites, folding with rubber spatula just until blended. Pour into 2 ungreased 10-inch angel food (tube) cake pans.   

Bake about 25-30 minutes or until top springs back when touched lightly. Immediately turn pans upside down onto heatproof funnel or bottle. Let hang until completely cool, about 1-2 hours. Loosen side of cake with knife or long, metal spatula; remove from pans. 

I decorated this cake with Vanilla Whipped Cream.  I doubled the recipe and was able to fill and decorate one 8" double layered cake with piped roses. 

Note: This batch yielded two 8" round cake pans, with the bottoms lined with parchment paper (baked for 15 minutes) and one 10" angel food cake pan for about 30 minutes.  Next time, I will bake the whole batch in two 9x13 pans for about 15 minutes for a bigger double layered cake.    


Soft and cloud-like, chiffon cakes go down too easy!

The cake turned out so pretty.  Perfect for Mother's Day!

[Edited to add: ] Here is another picture of a coffee sponge cake I made last summer.  Back when I was able to eat chocolate. 

 Luscious fresh raspberries on a coffee sponge cake with whipped cream and shaved Callebeaut dark chocolate.  Also very yummy!

Enjoy!
Pin It

Monday, May 14, 2012

Muffin Tin Monday - May 14, 2012

What a great Mother's Day weekend!  We usually celebrate our holidays for almost a week.  It all started when hubby had to work Christmas Day or Christmas Eve several times the past few years.  To get around this, we celebrate over a course of a few days.  It's great when my birthday lasts for a week!  

We were busy with activity the whole weekend. The kiddies were starving when we got home after their piano lessons.  Of course, that's when moms become Iron Chef Mommies...complete with a panel of judges with discerning kiddie palates.

The theme?  Whatever in the fridge and pantry to feed starving, grumpy, whiny kids... it should be relatively healthy and FAST! 


This is what my fridge and pantry yielded:  red grapes, goldfish crackers, leftover oven roasted corn, leftover oven roasted bacon and yogurt with fresh strawberries.  


They ate in record time and declared themselves full after they inhaled everything!  Whew!  

For more great lunch ideas, please check out  Muffin Tin Mom.

Enjoy!


Pin It

Saturday, May 12, 2012

Oven Roasted Corn on the Cob

It feels like summer is finally approaching when I see the corn on the cob and watermelon in the supermarkets.  However, in our rural Canadian southern interior town, it feels like spring is starting to emerge.  Our winters are long and sometimes very cold (as cold as -38C or -36F without the windchill!).  For a nice change, I bought some fresh corn and roasted them in the oven.  So tasty and so easy!


The corn steams and cooks in the husk.  The flavours are intense with this method.  This is Tyler Florence's recipe and yes, he knows how to eat!  


It was pretty easy to prepare the corn.  Rinse and trim some of the husks.  Make sure you don't cut too close to the corn or the tips might burn.


While rinsing, I even ran some extra water down the middle of the corn.  I like my corn juicy!


Place the ears of corn directly on the oven.  You can place as many as your oven fits!  Bake for 30 minutes in oven preheated at 350F.  I turn it halfway through.  


After 30 minutes, simply peel the husk and silk back.  It is really easy to remove.

Oven Roasted Corn on the Cob

Preheat oven to 350°F    
Rinse ears.
Place corn cobs in middle rack in oven. 
Bake for 30 minutes.  (I turn them halfway through)
Remove corn cobs. Pull back husks and enjoy!

Enjoy!
Pin It

Thursday, May 10, 2012

Muffin Tin Snack Day

It's Nessa's turn for Snack Day at preschool and I think I have a system that provides a bit of everything for everyone.  There are 8 preschoolers in her class and I figure that a muffin tin of snacks can provide enough for that number of kiddies.


I tried to offer a variety of fruits and vegetables plus 1 protein.  Veggie cups have mix of cucumber sticks, baby carrots and sweet yellow bell peppers.  Even if the children don't eat their veggies, I know for sure they will gobble the bright red luscious strawberries and juicy watermelon balls.  I threw in the ham sausage slices for protein.  I really like how cute the silicone muffin liners turned out.  I guess the theme is "we eat whatever the supermarket has on sale and in season"!  


I also included a package of baked rice crackers.  Better to have too much food than not enough!

For more great kids' lunch ideas, check out Muffin Tin Mom.
  
Enjoy!
Pin It

Wednesday, May 9, 2012

Bento Style Lunches

What do I do for the kids' lunches?  Most of the time, it's usually a sandwich, a fruit or veggie and some crackers in an Asian sandwich box.  I didn't know that I arranged my food in a "bento" style, which is a visually appealing meal packed in a box.  I had some square Wilton silicone muffin liners that turned out great for keeping the food separated in the way that my kids like.

I came across BentoLunch.net and was awed by the creativity that these moms have. It's wonderful how they lovingly prepared gorgeous lunches for their little ones.  It's a great site for getting ideas, but I am nowhere close to artistry involved!  I'm just happy that the kids have a somewhat healthy lunch.   


All 3 kids' lunches are assembled in production line!


Spring is finally in the air!  I love using cookie cutters for sandwiches.  Nessa's lunch:  butterfly soy butter and jam sandwiches, baby chick grilled cheese sandwich, last night's steamed baby corn/carrot/sugar pea medley, some apple slices and gold fish crackers. 


Baby's lunch:  Maple leaf soy butter and jam sandwich, butterfly grilled cheese sandwich, steamed veggies, apple slices and goldfish crackers.


My 7-year old's lunch:  grilled cheese sandwich, steamed veggies, apples and goldfish.  He is growing up!  Last year, he told me that he did not want his sandwiches to be cut in shapes.  To make everything fit in his stainless steel Lunchbots container, I trim the crusts. Pretty soon, I will have to get him a bigger container.  For now, he says it's enough food.

  
All packed and ready to go!  


 I found these super cute Hello Kitty lunch boxes at my local grocery chain.  They were only $4.99!  

Enjoy!

Pin It

Tuesday, May 8, 2012

Singapore Rice Noodles

What a wonderful weekend!  We went down to Vancouver for a family wedding.  It was great to catch up with my cousins and their children on my father's side!  The last time I saw them all, it was at my cousin Stan's wedding, which was before my girls were born.  My mother took the children for the evening and we were able to enjoy the wedding.

The next day, we caught up with my mother's family for dinner at a Chinese restaurant.  Again, it was so much fun to see my aunts, uncles and cousins.  We ordered a bunch of family favourite dishes and had a great time catching up.  

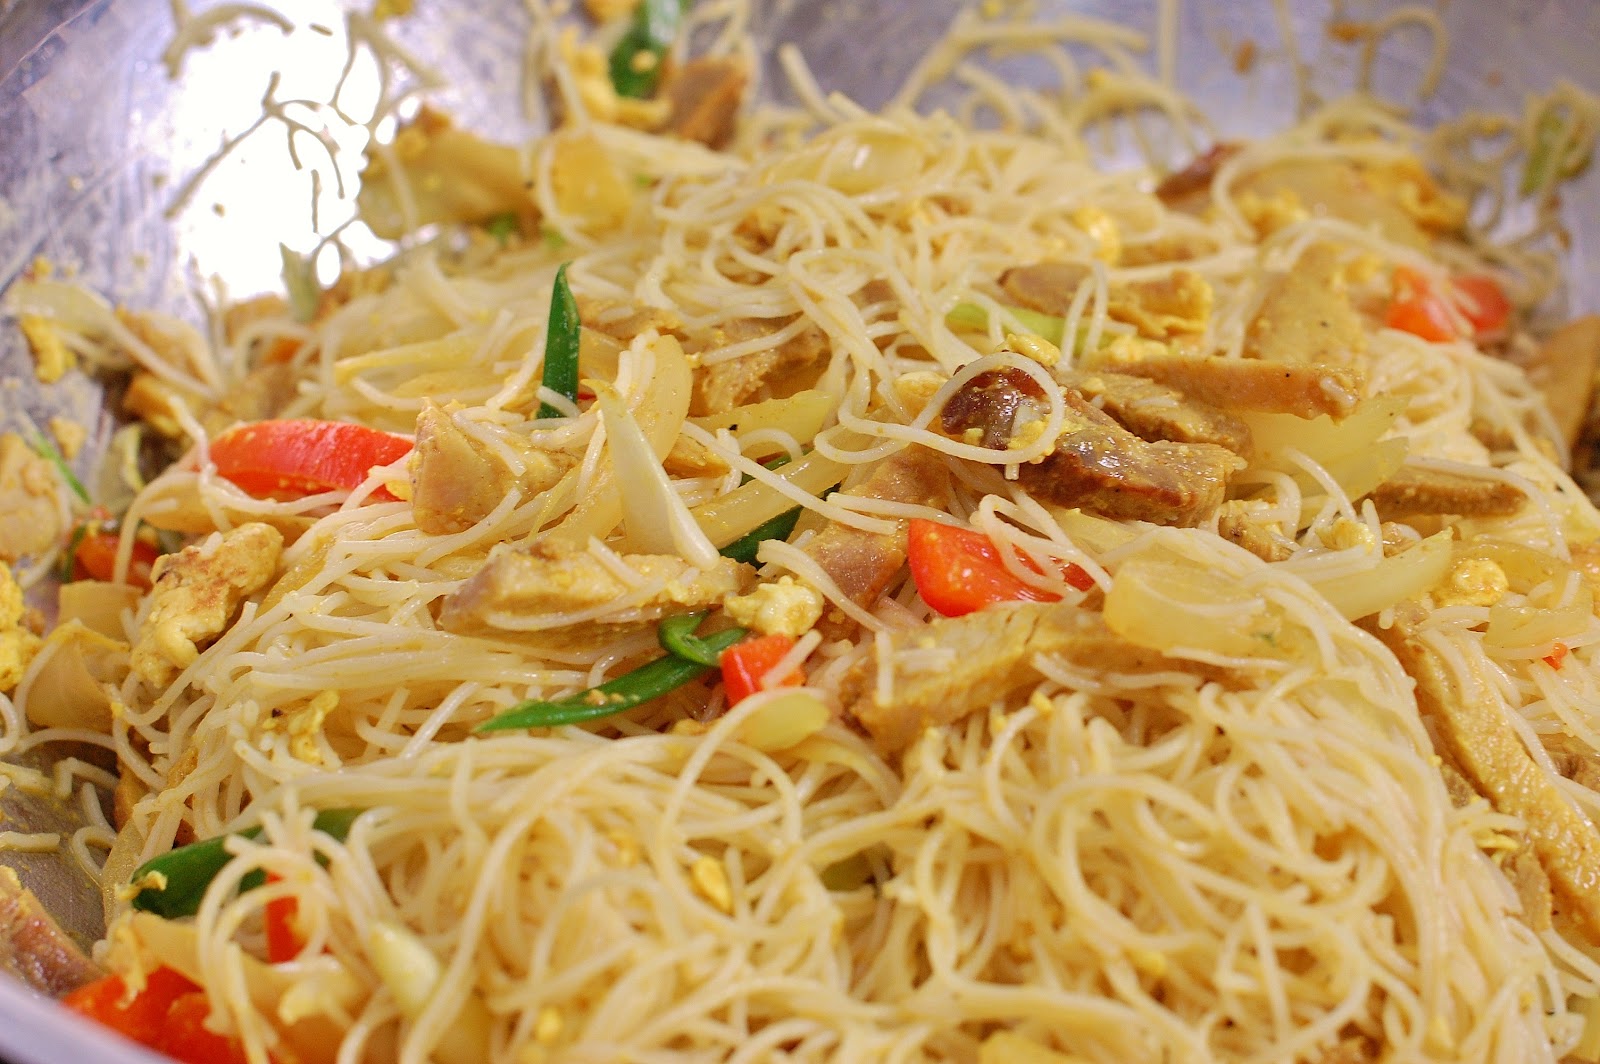
Singapore rice noodles is a classic Cantonese dish that our family orders from Chinese restaurants or at the food courts in the Asian malls.  It is a common dish that probably no one really makes at home as it is so readily available in casual Chinese restaurants.  I wanted to make a less greasier, cleaner version at home.  I used a base recipe from my 10 year-old cookbook, WeightWatchers Take-Out Tonight!.   

This dish is comprised of stir-fried rice noodles with prawns, barbecue pork or chicken, and veggies. It's distinct yellow hue is from turmeric and curry powder.  Depending on the cook, it can be very spicy.   Like a lot of stir-fry Asian recipes, this dish can be customized to your liking with your favourite meat and vegetables.  The kids and I can't handle things too hot, so I tone it down. 


The key to making rice noodles:  do not overcook. Overcooked noodles are mushy and they break apart into tiny little bits.  I have seen so many different recipes on how to prepare/cook rice noodles and I find that soaking them in hot water for 5-6 minutes gives great results.    


Dried rice noodles come in 14oz or almost 1lb package.  Each package has about 2-3 pieces.  Since food does not last long in our house, I normally double the recipe and use the whole package of noodles. 


Bring a large pot of water to a boil and remove it from the heat.  Soak 1-2 pieces of rice noodles into a pot of hot water for 5-6 minutes until softened. 

  
After 5-6 minutes, the noodles will be softened but still be undercooked. 


Place the noodles onto a large dinner plate to air dry, so the noodles will retain its shape when the curry sauce is added. 


Heat 1 tablespoon canola oil in a large pot or wok on medium-high heat.  Stir-fry onion for 1-2 minutes until soft but do not let them go brown. I prefer to use canola oil for this dish as extra virgin olive oil gets too smoky at high temperatures.
 

Add the red peppers and stir-fry for another 1-2 minutes until crisp-tender.  Remove the onions and red peppers from the wok.   


Scrambled eggs are optional in this dish. I have seen some restaurants use it and I like to sneak in extra protein and veggies with noodles.  Add another tablespoon of canola oil at medium-high heat and then add 2 scrambled eggs to the wok.  


When the eggs are half-cooked, dump in the cooked onions and red pepper.  Using a spatula, break up the eggs and stir-fry until the eggs are cooked.


Then add 1/2 cup chicken broth.   I took extra pictures to show that the cooked egg looks ugly and messy.  Bear with me, it does get better!


Add the meat (I use barbecue pork), curry powder, turmeric, sugar and salt.  Simmer for 1 minute.  Make sure to take the wok off heat and then add the green onion.  The curry powder gives the dish its distinct flavour and turmeric gives the noodles its classic yellow colour.  Without turmeric, the noodles will not be as vibrant as the ones made in the restaurant. 


At this point, the ingredients in the wok do not look appetizing.  It looks like a yucky mess with the egg all broken up!  Don't worry!  It will look yummy when the noodles are added.  Again, the scrambled egg is optional.   


Next, add the prepared rice noodles. The noodles will be cold and clumped together.  Let the noodles soak up the chicken broth for a few seconds. With chopsticks or a fork, wiggle the noodles around.  The noodles will loosen up as it soaks the liquid.  Toss the noodles with the rest of the ingredients, like a salad.   


Done!  Add more salt and pepper to taste.  I only use 1/4 teaspoon tumeric but if you like a more vibrant yellow hue, you can add a bit more.  I notice as the dish sits longer (overnight), the noodles do get more yellow the next day.

Singapore Rice Noodles

5- 6oz dried rice noodles
big pot of boiling water

2 Tbsp canola oil
1 cup sliced onion
1 cup red pepper, sliced in strips
2 eggs, beaten (optional)
2 green onions, 1 inch long, slivered pieces
1 cup barbecued pork, cooked chicken or firm tofu, sliced
3/4 cup broth, chicken or vegetable
2-3 tsp curry powder, if you like spicy (I use 1.5 tsp)
1/4-1/2 tsp turmeric powder (I use 1/4 tsp)
1/4 tsp sugar
1/2 tsp kosher salt, plus more to taste 

Bring a large pot of water to a boil.  Remove from heat; add the dried rice noodles and soak until softened, 5-6 minutes.  Drain and set aside on a large plate.

Heat 1 Tbsp canola oil over medium-high heat.  Add the onion and stir-fry for 2 minutes until softened. Add the bell pepper and stir-fry until crisp-tender, about 1-2 minutes.  

If using eggs:  remove the onions and red pepper and set aside on a plate.  Heat 1 Tbsp canola oil over medium-high heat.  Add the eggs and cook for 1 minute.  When half-done, add the onions and red pepper back to the eggs and break it all up with a spoon or spatula. 

Add the chicken broth, curry powder, tumeric, sugar and salt.  Then add the cooked meat (pork chicken or tofu).  Simmer 1 minute.  Add green onion. Take off heat.

Add the noodles and toss ingredients together until heated through, about 2 minutes.  

- Adapted from the cookbook: WeightWatchers Take-Out Tonight!


 The next day, the leftover noodles appeared even more yellow and intense.  The kids really enjoy these noodles, so I am hoping that they will make this on their own with these instructions.  Although Chinese cooking is pretty simple, there are a lot of little tips, tricks and vague nuances that each cook has.  Even with the same recipe, my dishes will never taste like my grandma's no matter how hard I try!  Hopefully, my kids can capture a bit of their childhood when they try to recreate this dish. 

PS:  Here is a souvenir we got from the wedding.  They had a really neat photo booth with a bunch of props, hats, wigs, sunglasses, etc.  Can you tell we have fun wherever we go?


Enjoy!


Pin It

Wednesday, May 2, 2012

Whole Wheat Blueberry Honey Bran Muffins

Trying to eat better is always a struggle!  I strive for balance and moderation. The cupcakes are a great treat and fundraiser but we can't that all the time or it wouldn't be special anymore.  Looking around the web, there is a wonderful movement for eating real food.  Food that is unrefined, unprocessed, made from scratch and organic.  

So I tried to look for a bran muffin recipe that was: 1) simple and easy  2) didn't use white sugar or white flour and 3) healthy.  I came across the Eat Clean Diet website for Blueberry Bran Muffins and had to give it a try! 


They turned out beautiful!  Maybe it's just me, but I thought they were a little on the sweet side.  Hubby didn't complain that they were too sweet.  Nor did the kids.  Next time, I will try use 1/3 cup honey instead of 1/2 cup and see if anyone notices the difference. 

Whole Wheat Blueberry Honey Bran Muffins

Makes 1 dozen
1 1/2 cups wheat bran
1 cup skim milk (I used 1% buttermilk)
1/2 cup unsweetened applesauce
1 egg
1/2 cup honey (Next time will try 1/3 cup)
1/2 tsp vanilla
1 cup whole wheat flour
1 tsp baking soda
1 tsp baking powder
1 tsp salt (I used 1/2 tsp )
1 cup blueberries (fresh or frozen) (I used 1.5 cup)

Preheat oven to 375F.  Line or spray muffin tins with oil. 

Mix together bran and milk - let stand 10 minutes.

In a large bowl, mix applesauce, egg, honey and vanilla. Sift together flour, baking soda, baking powder and salt, make a well. Add wet ingredients to the dry ingredients, stir until combined. Add bran/milk mixture and mix until just blended. Fold in blueberries.

Scoop into muffin tins and bake for 15-20 minutes, until the tops spring back when lightly tapped.

- From The Eat Clean Diet: Blueberry Bran Muffins

  
It's so rewarding to watch my family enjoy these muffins.  It keeps me going.  I try my best, but I won't feel guilty for the odd bag of potato chips and a rum (Malibu!) and Coke after a rough day! 


Enjoy!
Pin It